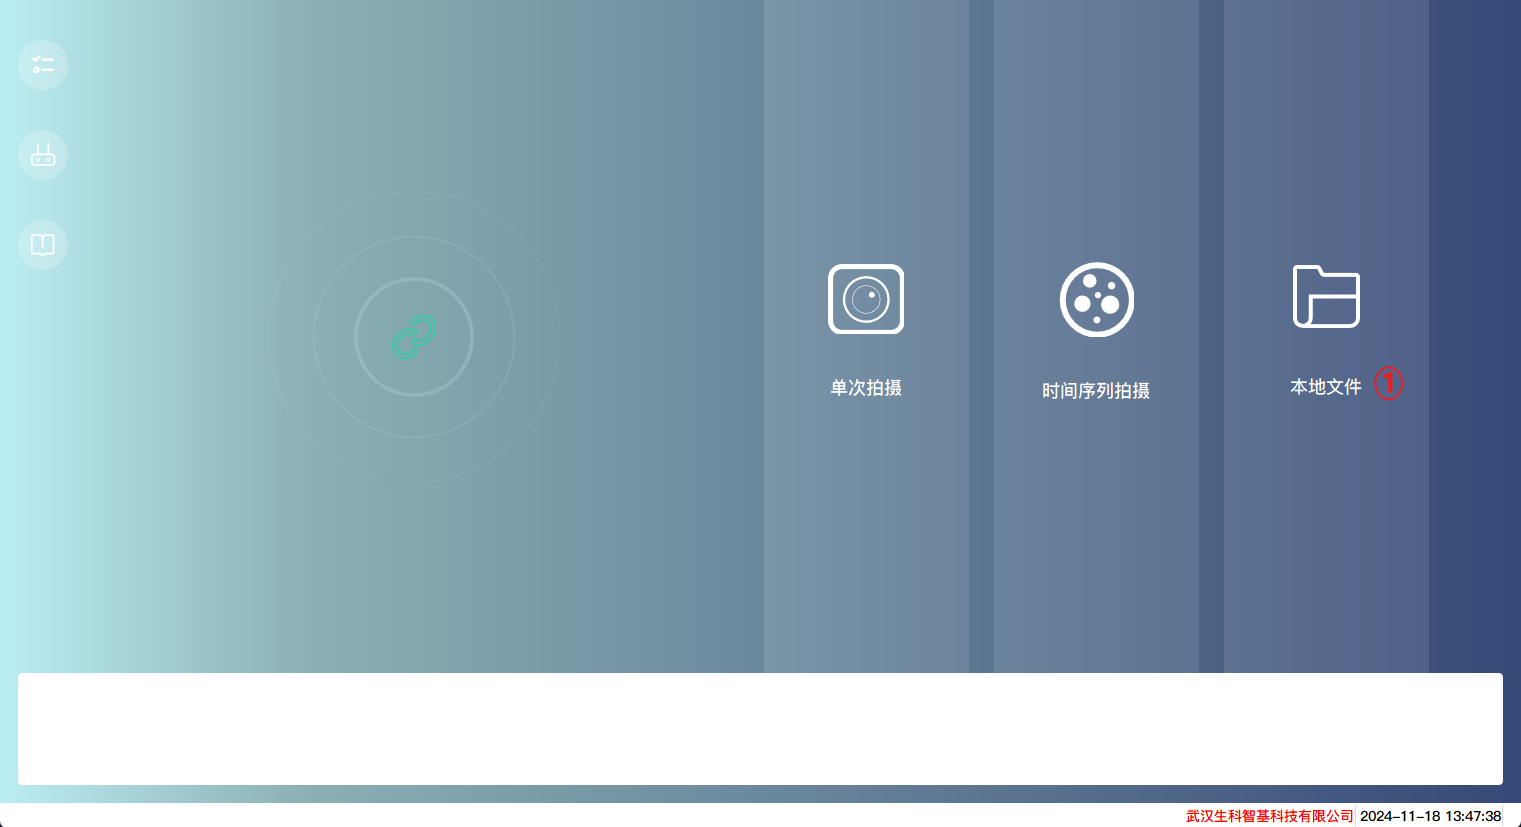
Features
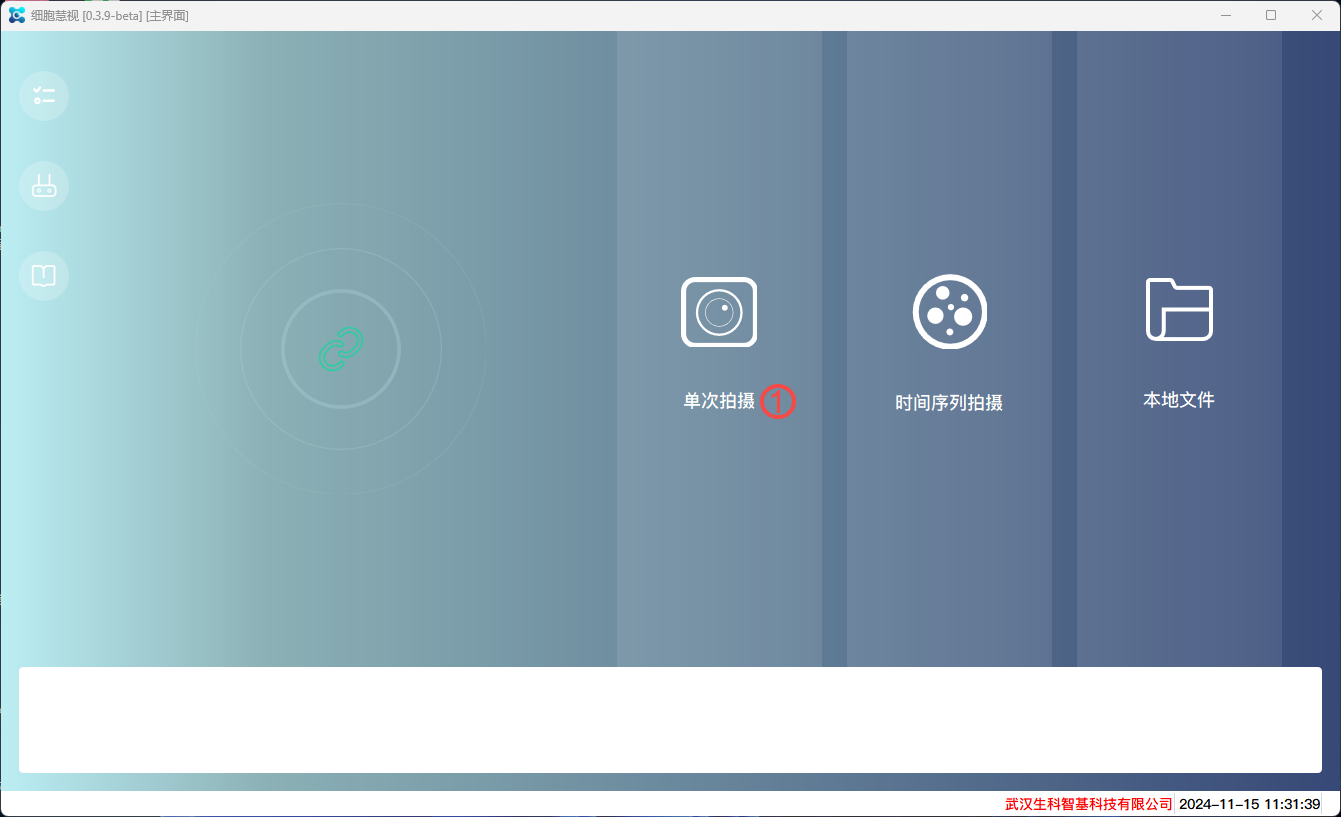
Single shot
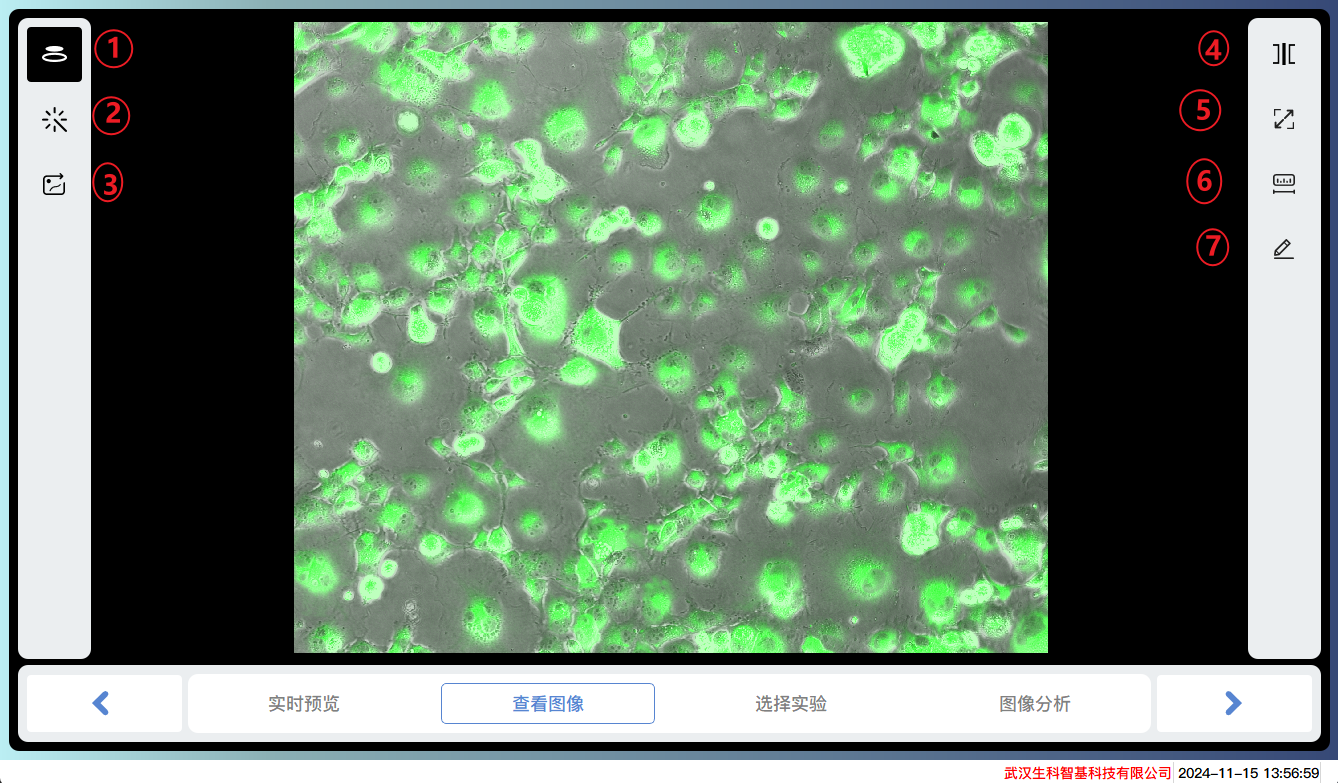
Display real-time images of microscope equipment, capture images of different channels, and analyze the images.
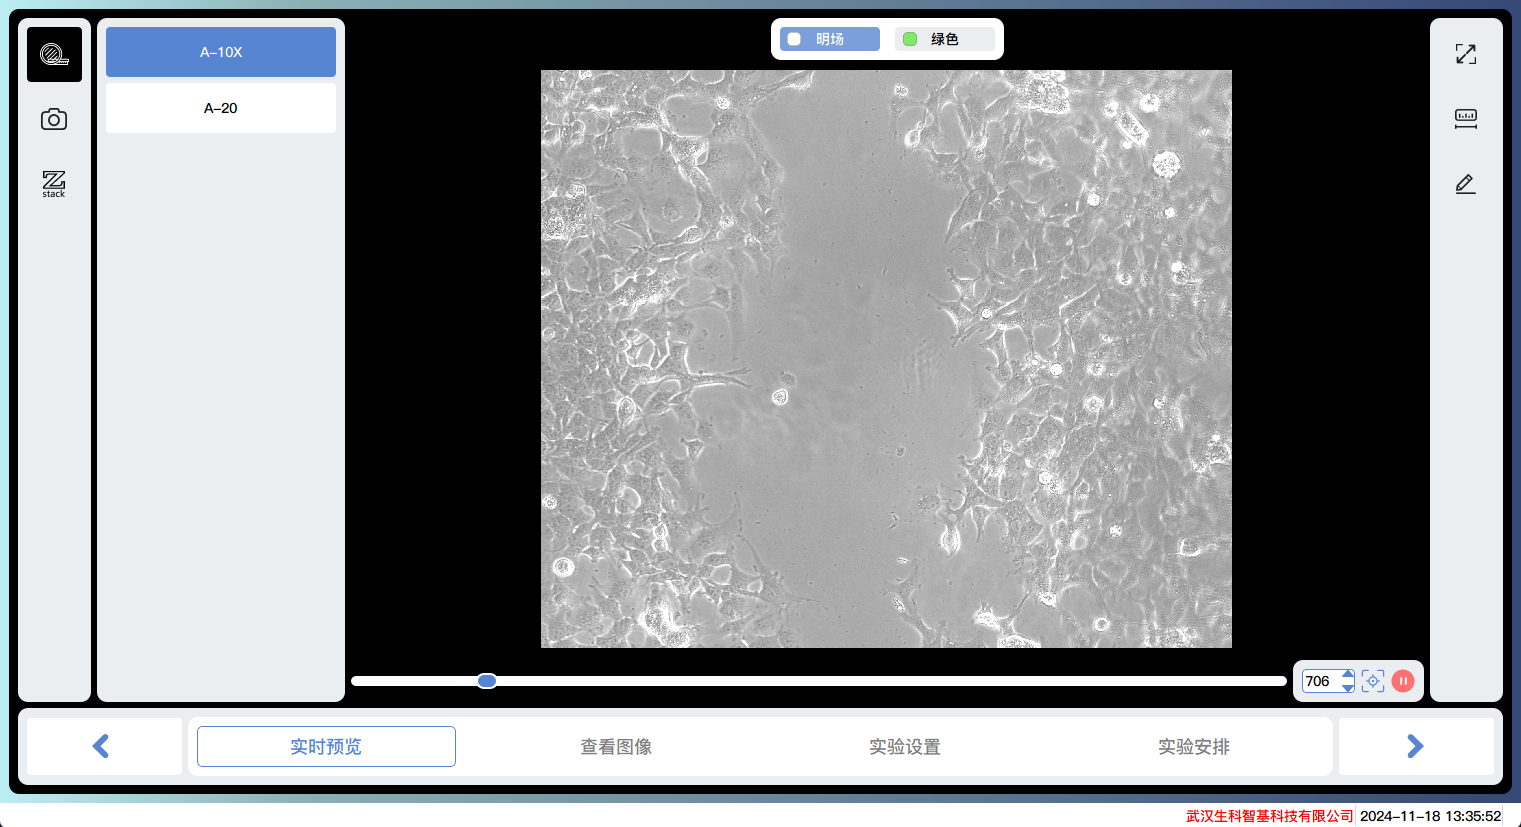
Preview
Read real-time images from microscope equipment and display them. It can adjust light intensity, exposure time, exposure gain, Z-axis movement, autofocus, ZStack shooting, and other functions.
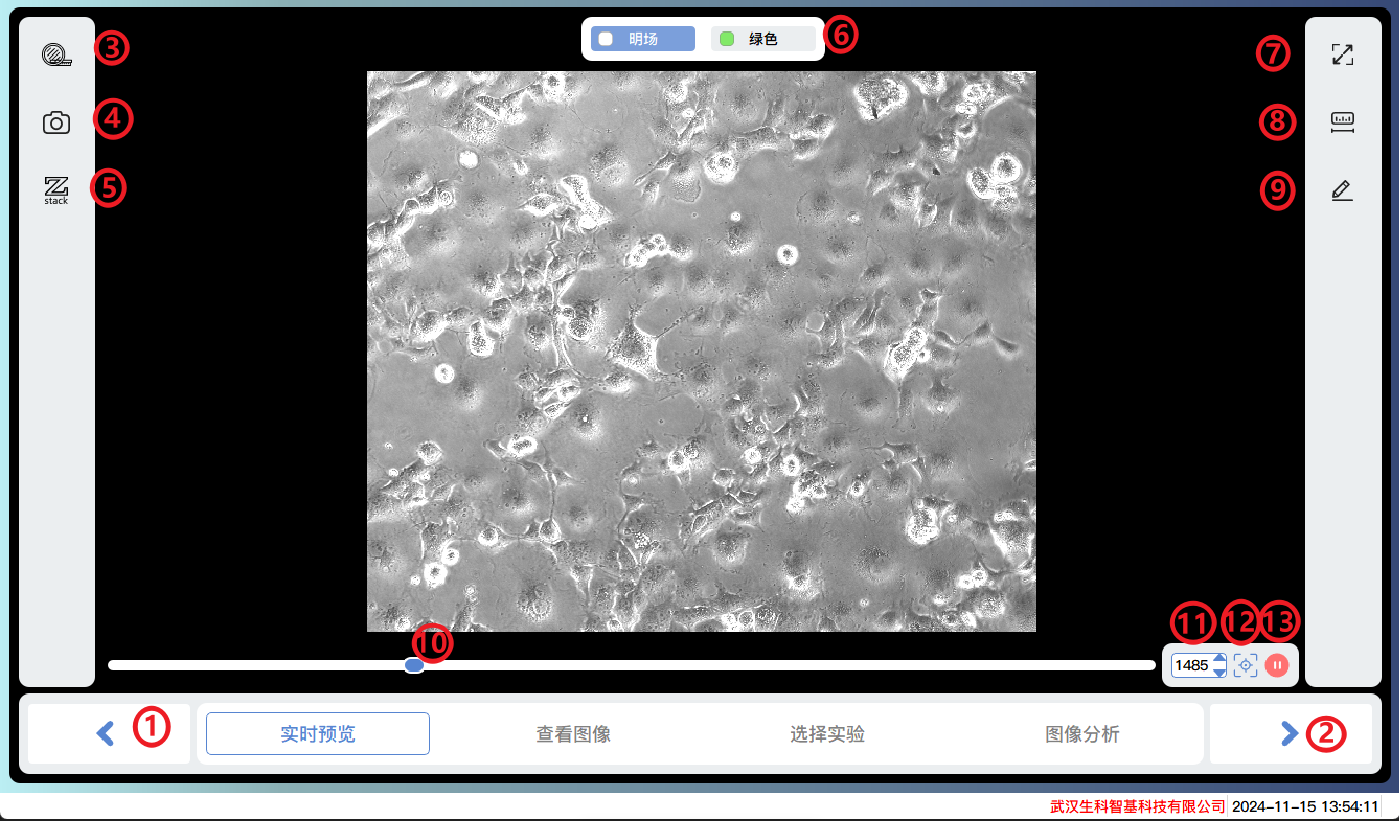
Previous step
Next step
Objective lens switching
Picture effect settings and shooting
ZStack shooting
Light source channel switching
Full screen display
Scale
Scale unit
Coarse focusing
Fine focusing
Auto focus
Stop autofocus
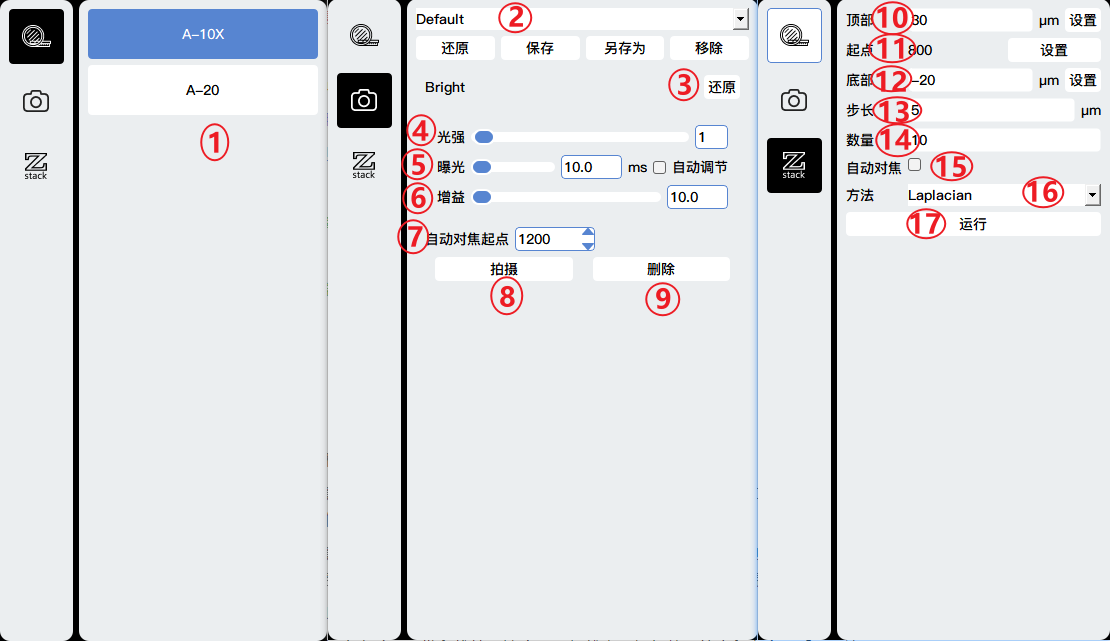
Objective lens switching
Template settings, adding, saving, deleting shooting parameter settings templates, switching between different templates to restore the settings of this template.
Restore settings
Light intensity adjustment
Exposure time adjustment
Exposure gain adjustment
Set the starting point for autofocus
Shooting
Delete the current shot
Distance upwards relative to the starting point
Starting point
Distance downwards relative to the starting point
Step size, distance of each step
Total number of shots taken
Whether to select autofocus first
Methods for Depth of Field Expansion
Run ZStack to shoot
View Image
View the captured image and adjust the image effect.
Adjustment of image effects for each channel
Preview of Image Preprocessing Effects
Export image files/videos
Multi view display
Full screen display
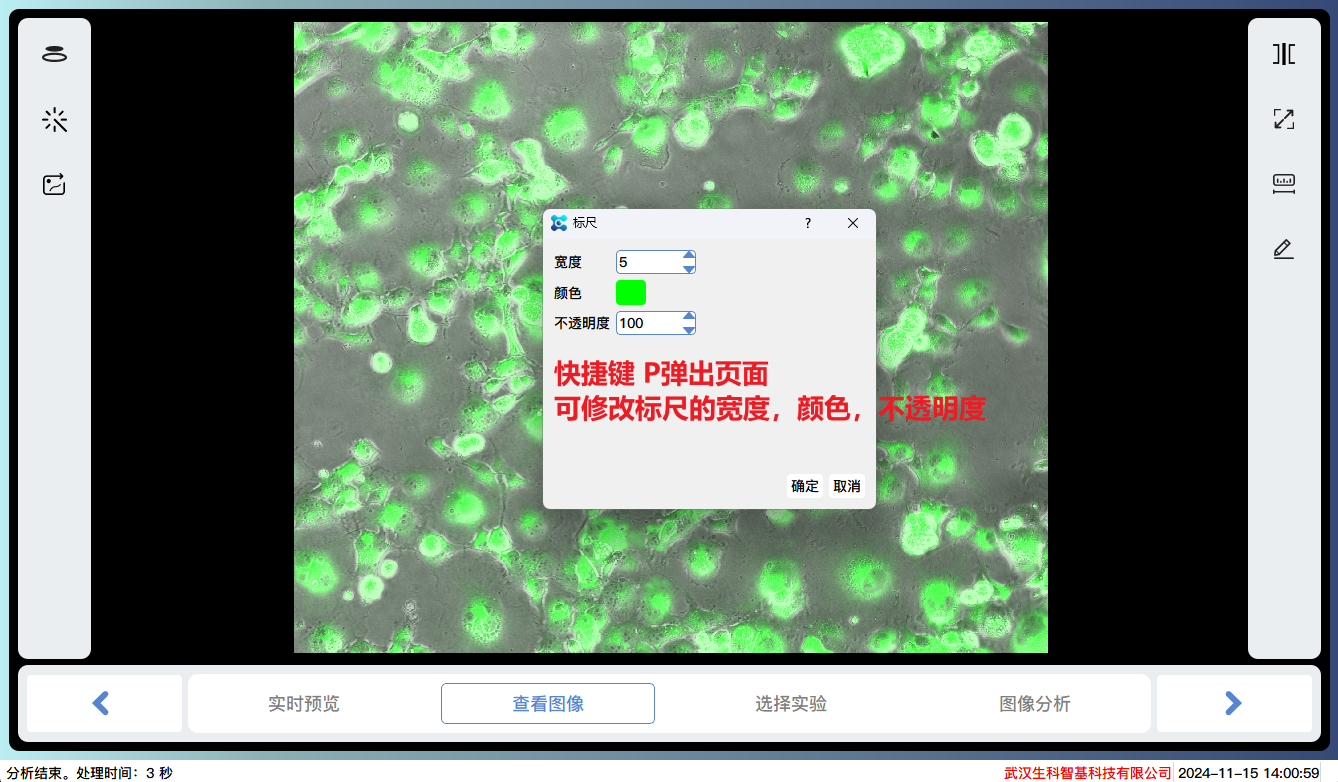
Scale bar
Scale units
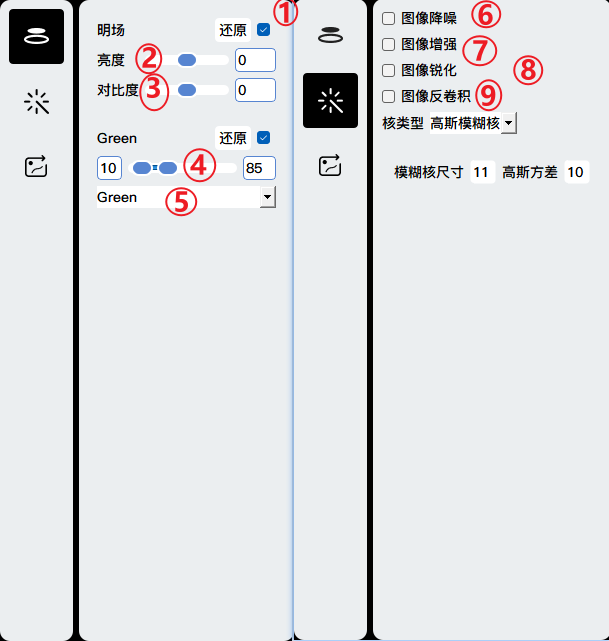
Display the channel image
Brightness adjustment
Contrast adjustment
Reduce background to the left and increase brightness to the right
Pseudo color selection
Image denoising to reduce background noise in the image
Image enhancement, enhanced image contrast, and background uniformity
Image sharpening enhances the edges of the image, making it clearer
Image deconvolution to improve image resolution and signal-to-noise ratio
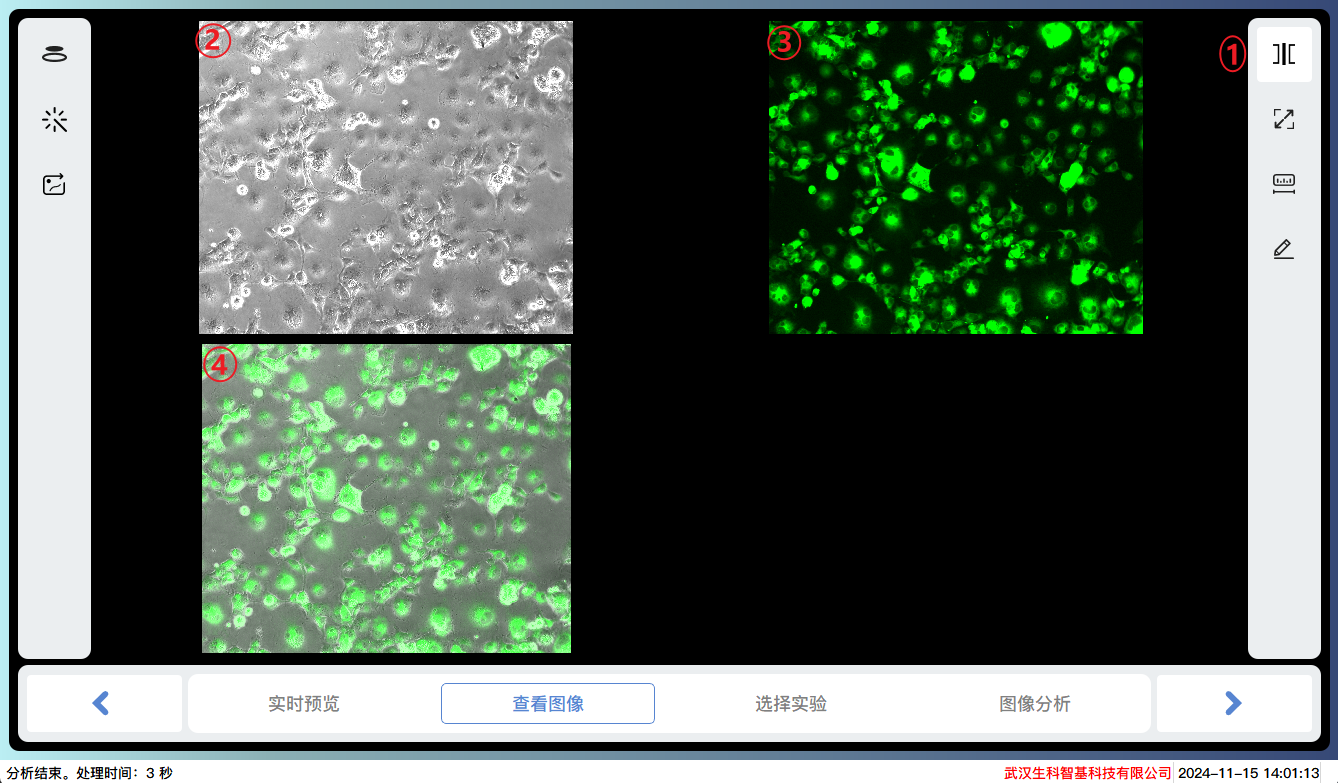
Multi view display
Bright field image
Green fluorescence image
Image obtained by superimposing bright field and green fluorescence
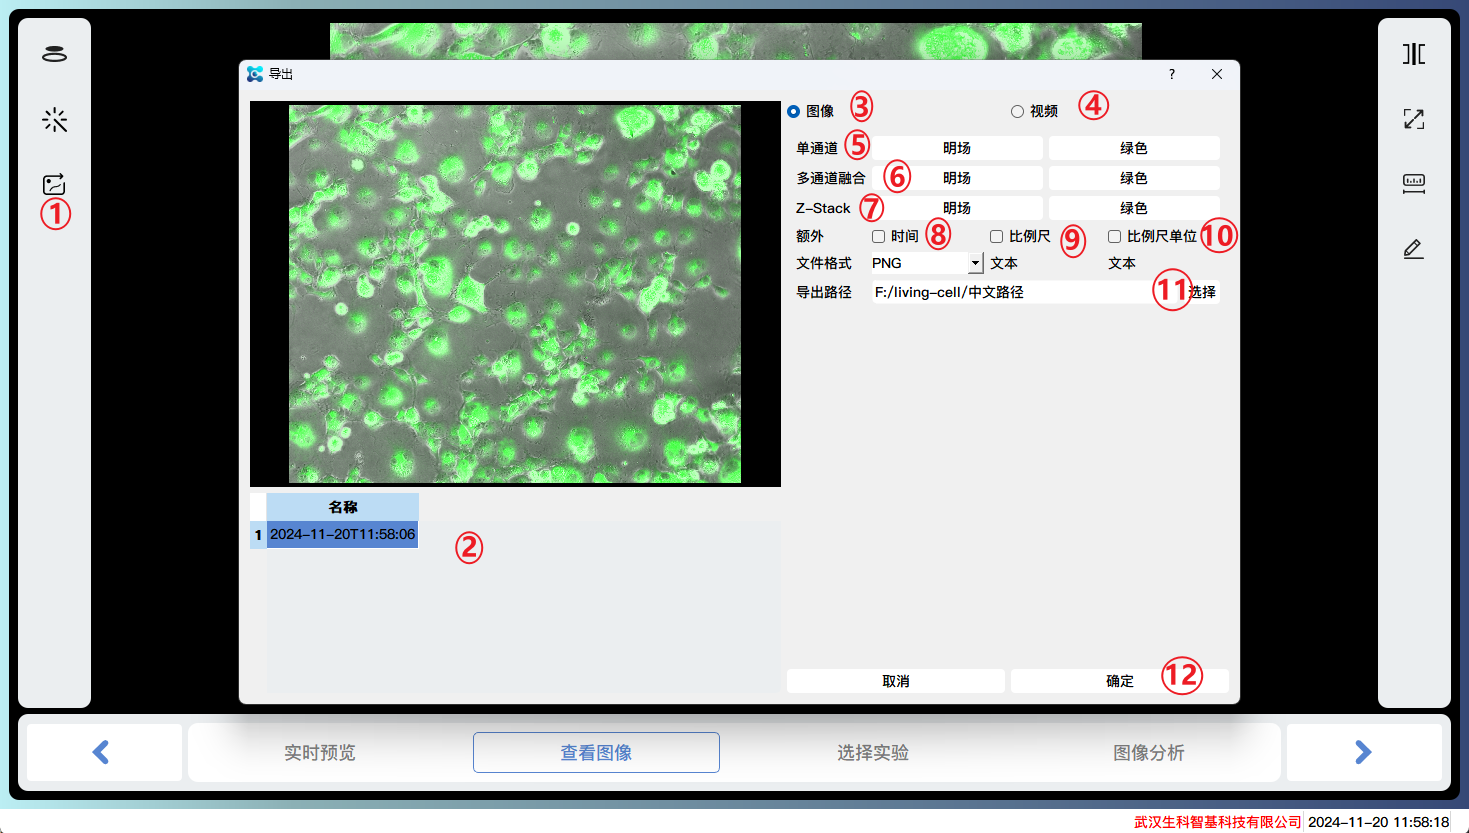
Image/video export
Select the image to be exported
Export image files
Export video files
Multiple selection of single channel images
Multiple channel images can be stacked and exported
Export channel images captured by Z-Stack
The exported image comes with relative time
The exported image comes with a scale bar
Export images with scale units attached
Choose the export path
Click OK to batch export multiple image files
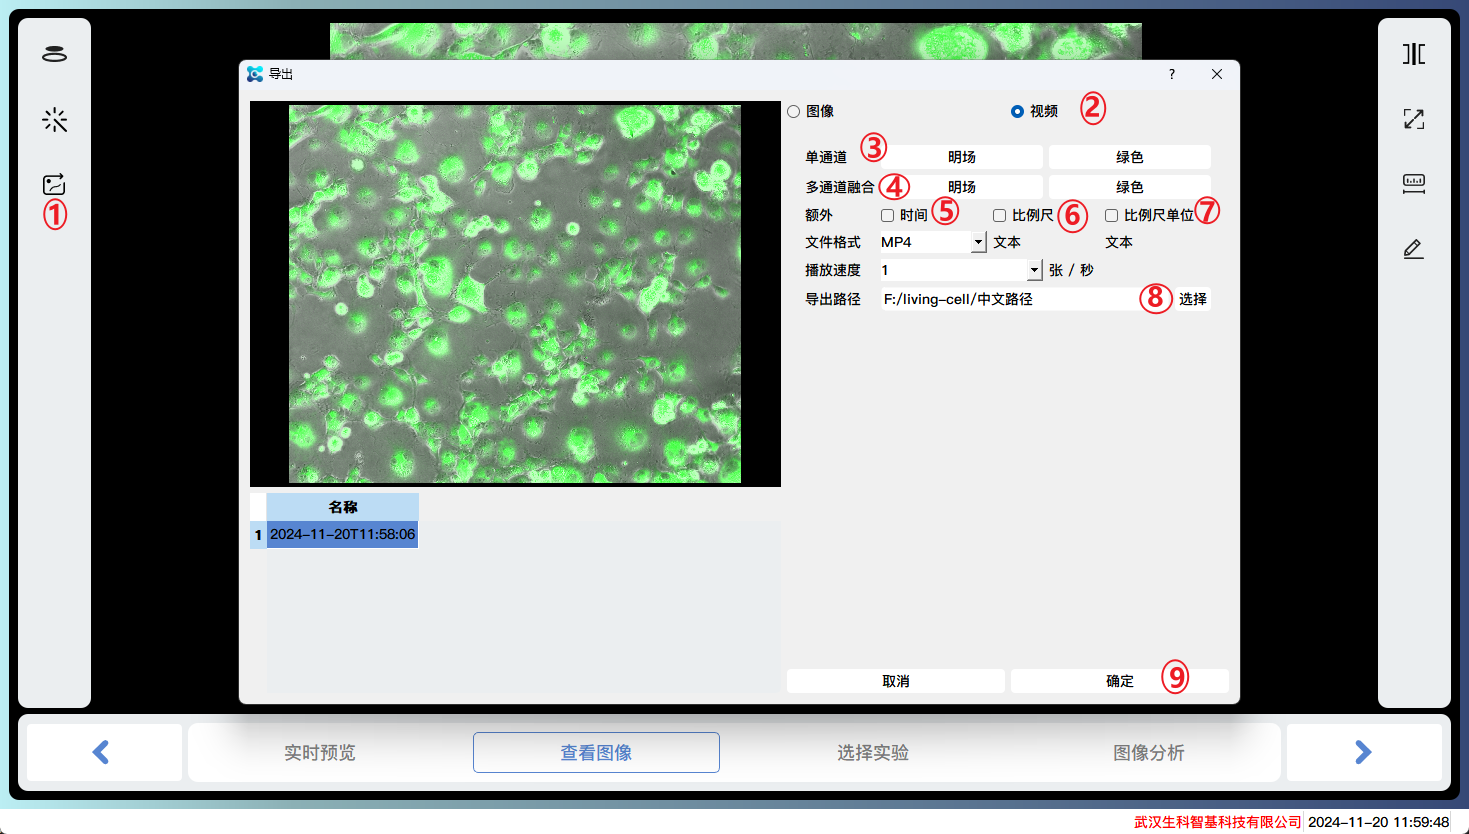
Image/video export
Export video files
Multiple selection of single channel images
Multiple channel images can be stacked and exported
The exported video comes with relative time
The exported video comes with a scale bar
Export videos with scale units attached
Choose the export path
Click OK to batch export multiple video files
Choose Experiment
Select an analysis module
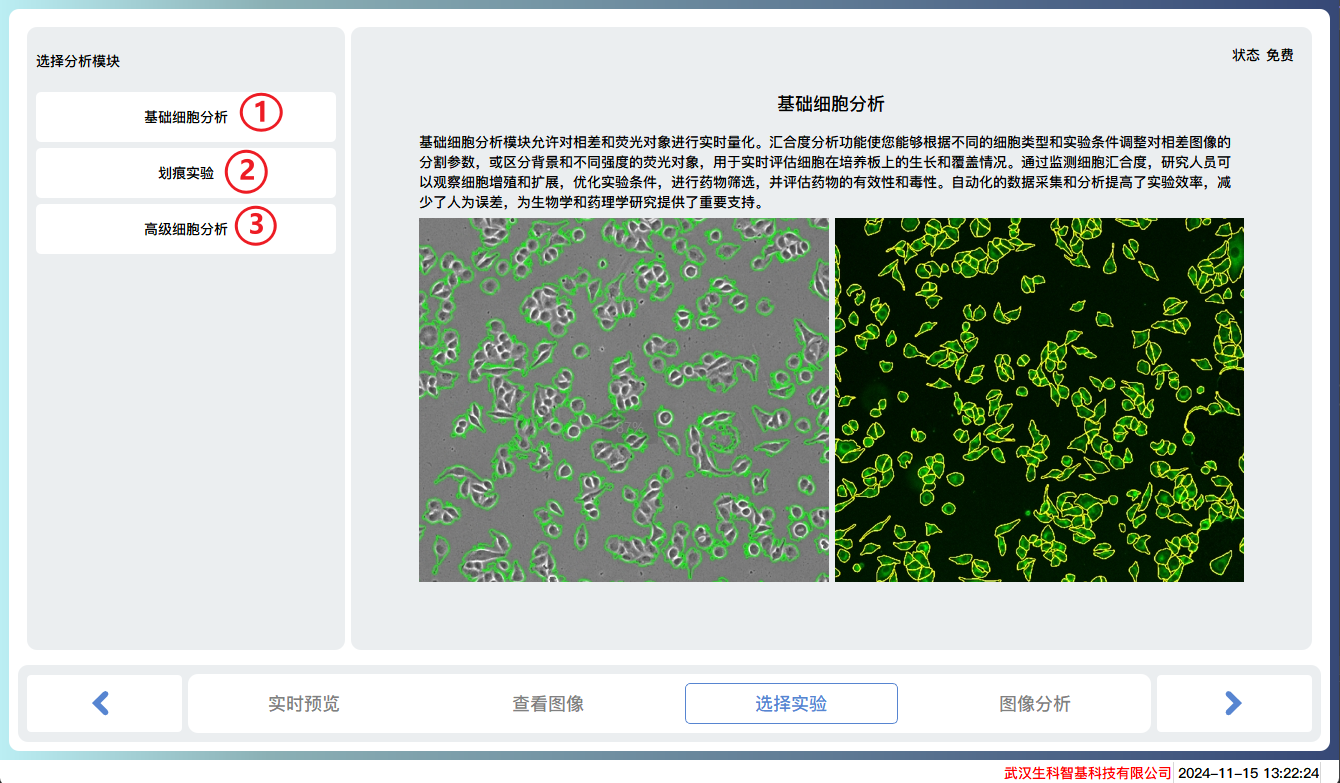
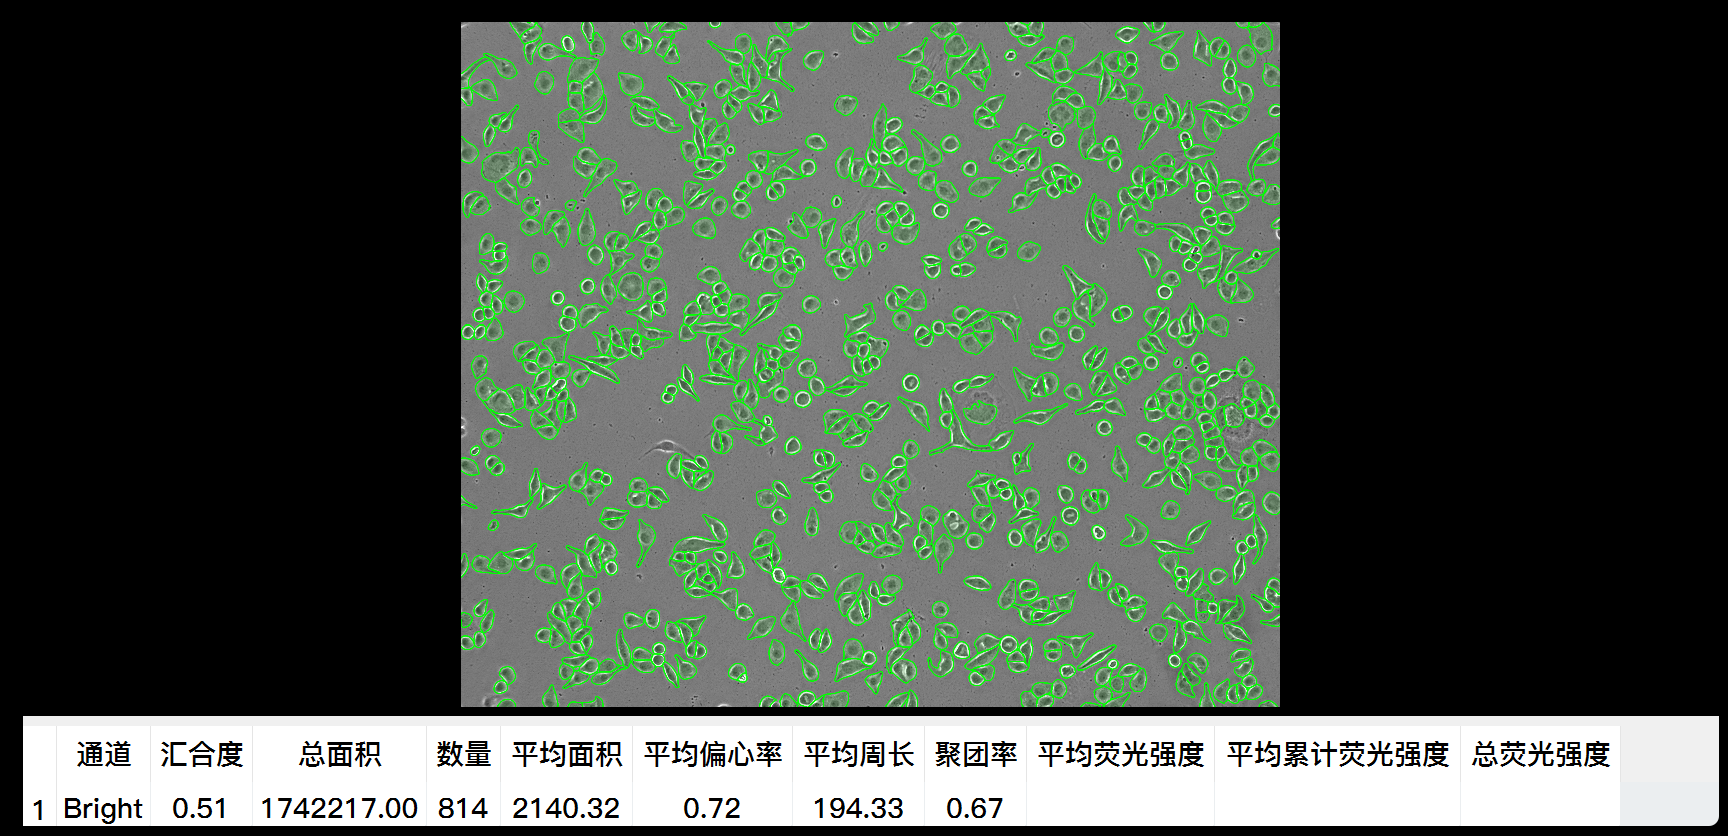
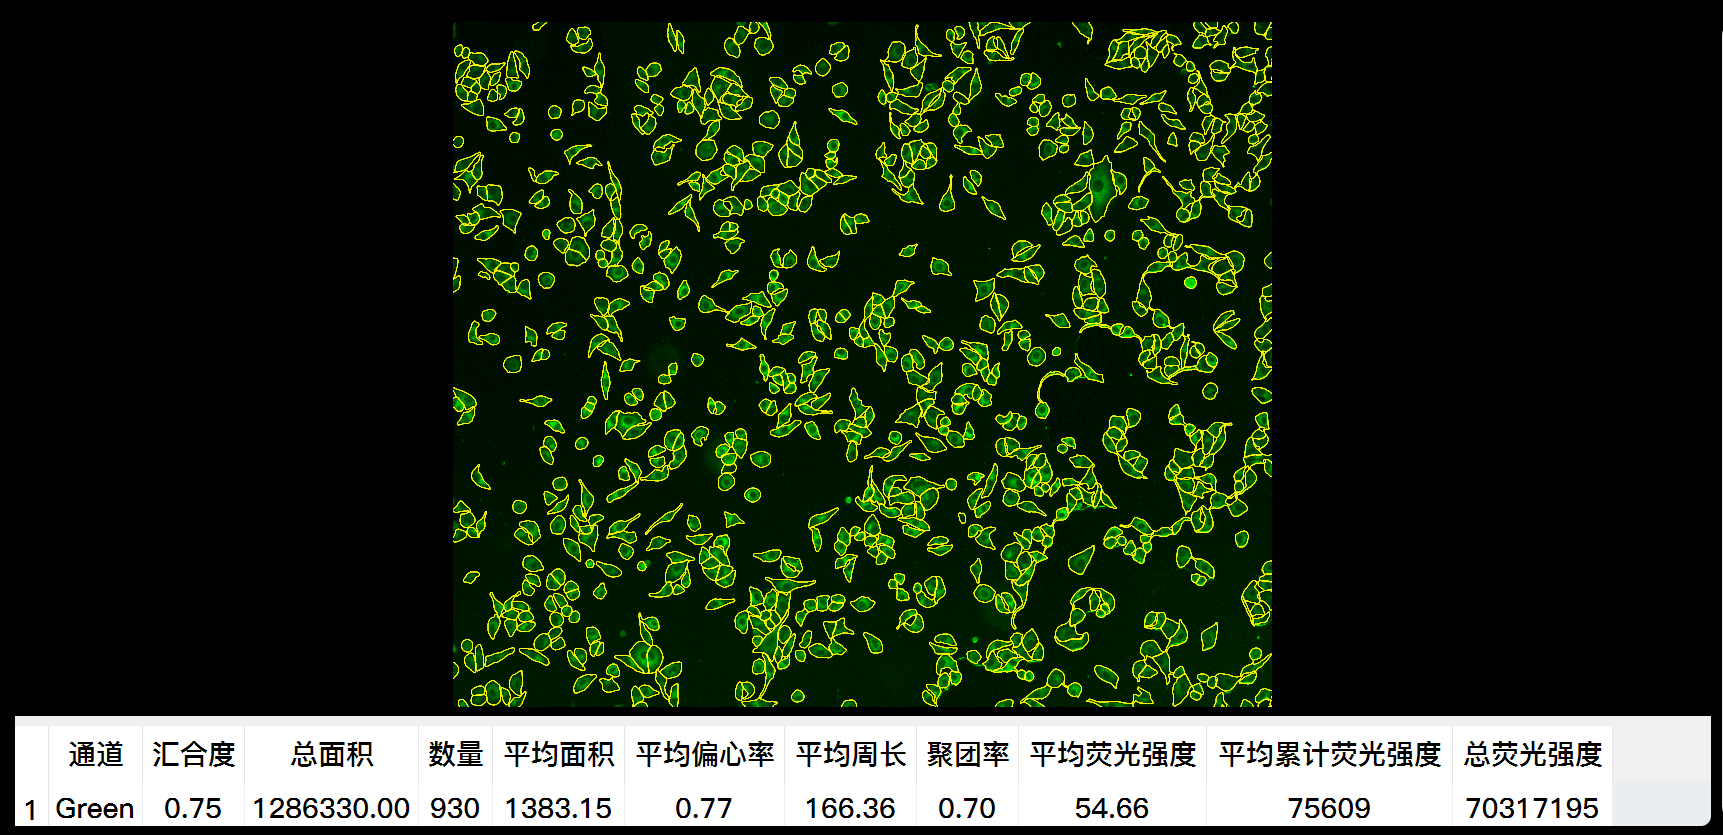
Basic cell analysis, using traditional methods to analyze images from different channels, displaying cell masks and related indicator data such as confluence degree, number of cells, fluorescence intensity, area, perimeter, and other indicator information.
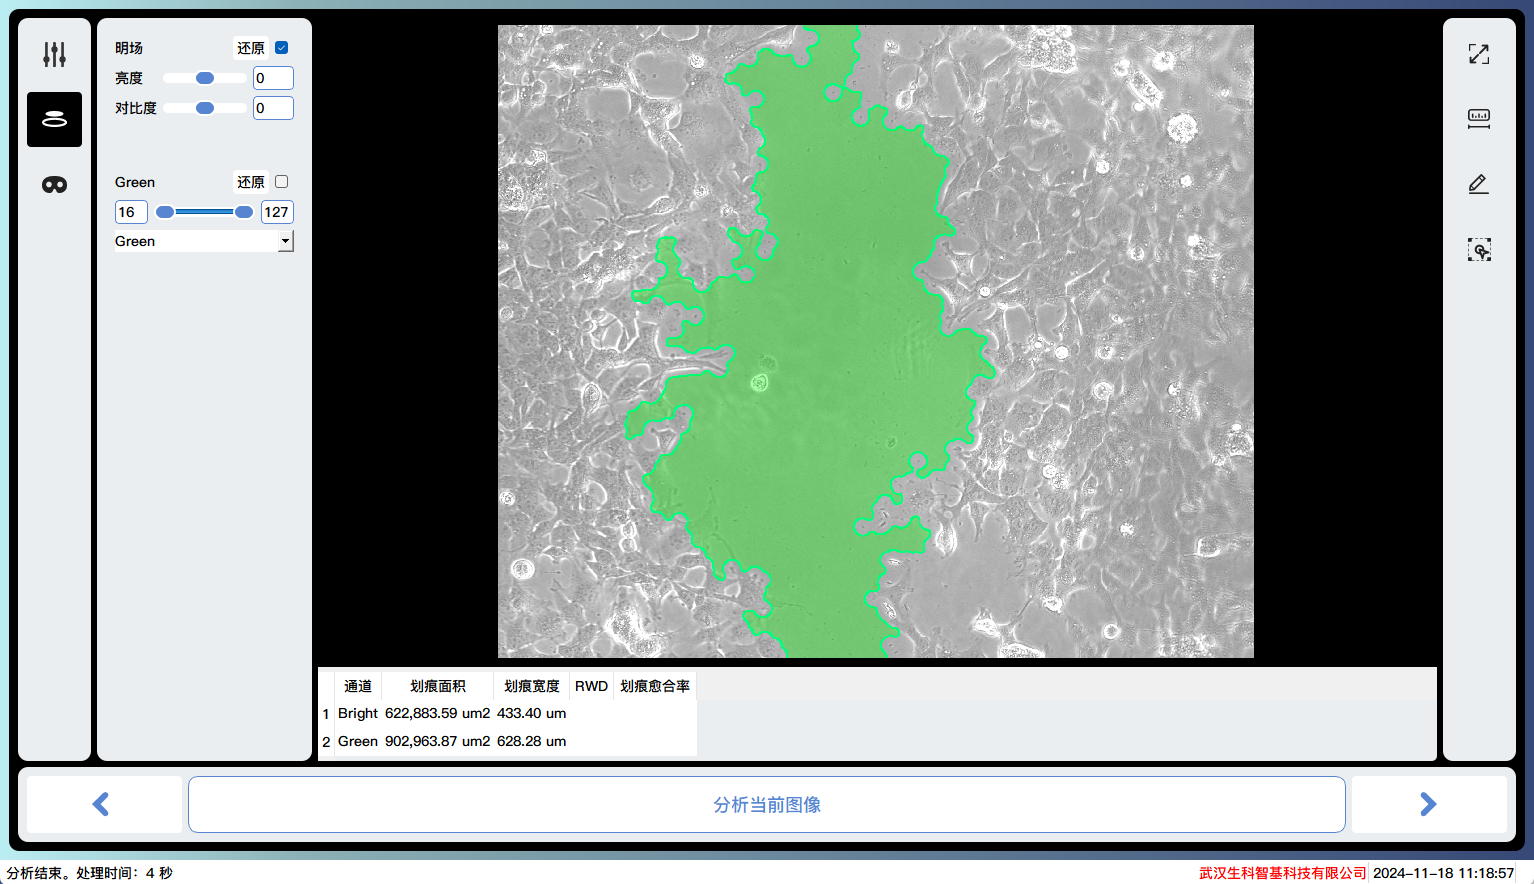
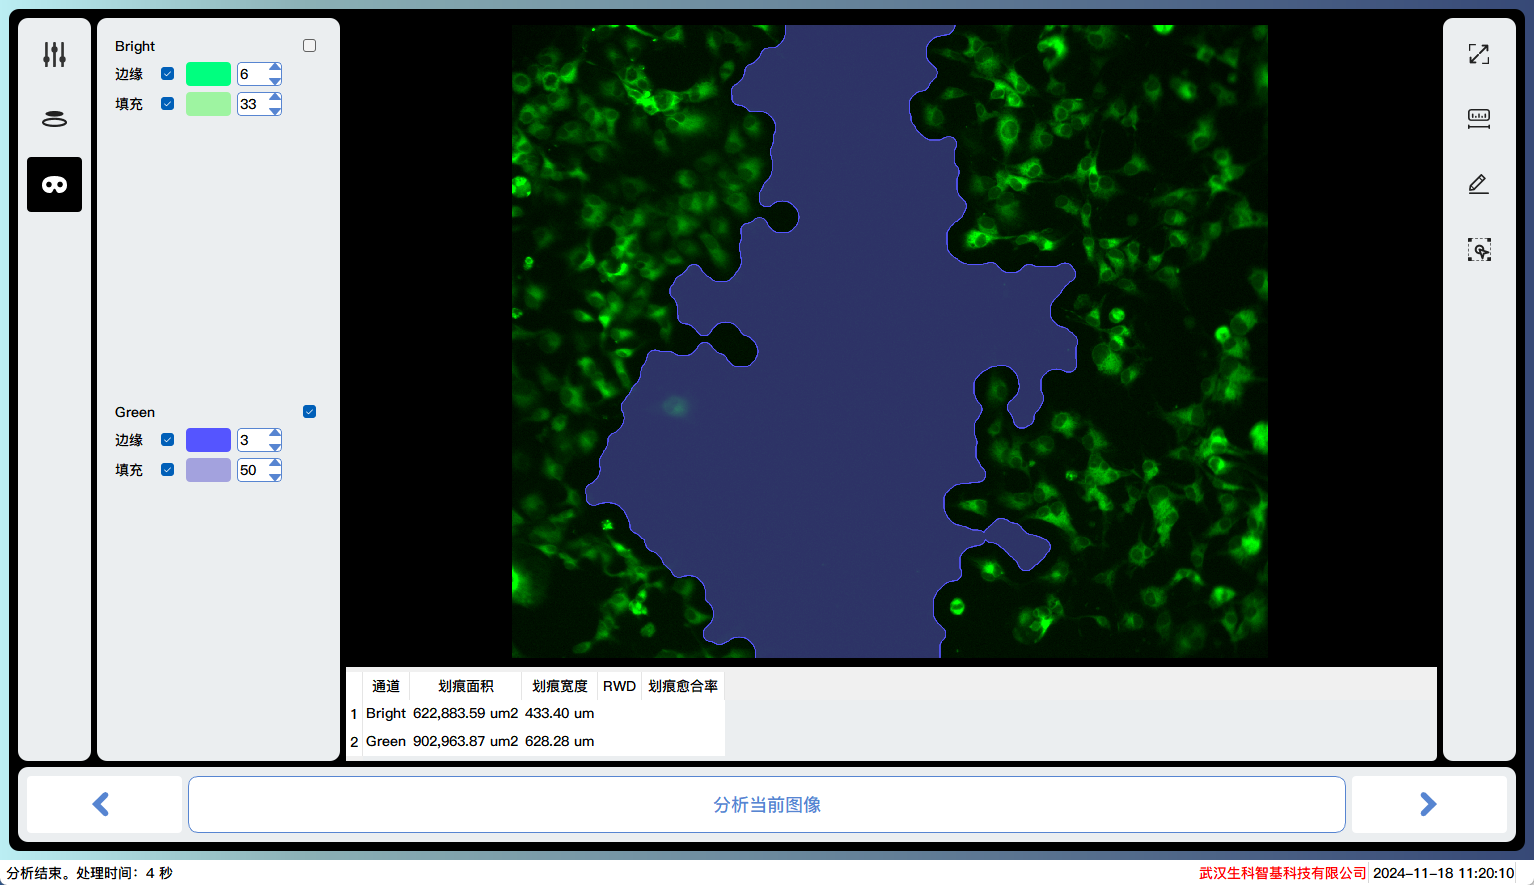
Scratch analysis, analyzing the scratch areas of different channels, displaying the scratch areas and related indicator data, such as scratch width, cure rate, and other indicator information.
Advanced cell analysis, using AI deep learning methods to analyze images from different channels, display cell masks, and related indicator data such as confluence degree, number of cells, fluorescence intensity, area, perimeter, and other indicator information.
Image Analysis
Basic cell analysis

Adjustment of analysis parameters for each channel
Adjustment of image effects for each channel
Mask adjustment
Full screen display
Scale bar
Scale units
Analysis of areas of interest
Analyze the current image
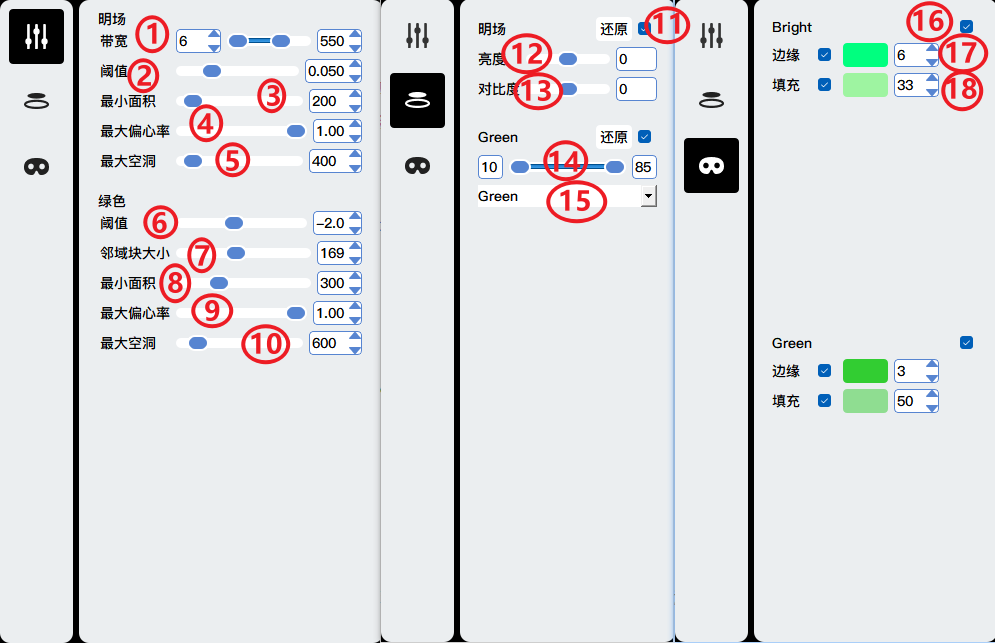
Bandwidth: Detail retention. The smaller the l-value, the easier it is to preserve large objects (such as uniform plaque contamination in the image); The larger the right value, the easier it is to preserve small objects (such as random Gaussian noise generated by devices); Suggest selecting the middle value
Threshold: Signal threshold. The smaller the value, the easier it is to preserve image details, and vice versa.
Eccentricity: Eccentricity screening threshold. The smaller the value, the greater the filtering effect on long or irregular objects, and vice versa.
Minimum area: The minimum area of the retained mask. The smaller the value, the easier it is to retain small areas of cells (and also more likely to introduce noise), and vice versa.
Maximum Void: The maximum area of a closed void. The larger the value, the larger the closed cavity, and vice versa.
Similar to 2.
Domain block size: The dynamic segmentation block size of the domain. The smaller the neighborhood block, the easier it is to be sensitive to small objects and recognize local small objects.
Similar to 3.
Similar to 4.
Similar to 5.
Display the channel image
Brightness adjustment
Contrast adjustment
Reduce background to the left and increase brightness to the right
Pseudo color selection
Display and hide the mask of a certain channel
Adjust the color and width of the edge lines of the mask
Adjust the color and opacity of the filled area
Demonstration of bright channel analysis results:
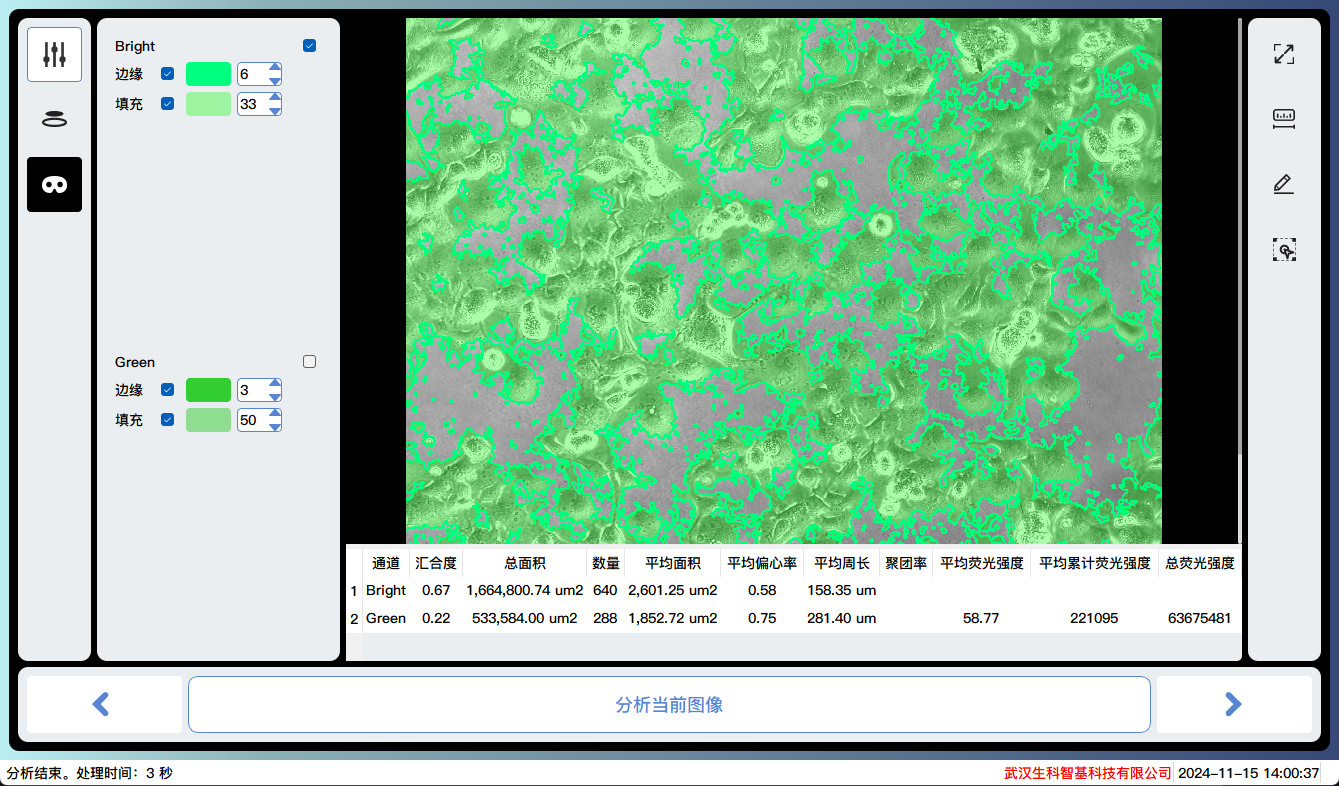
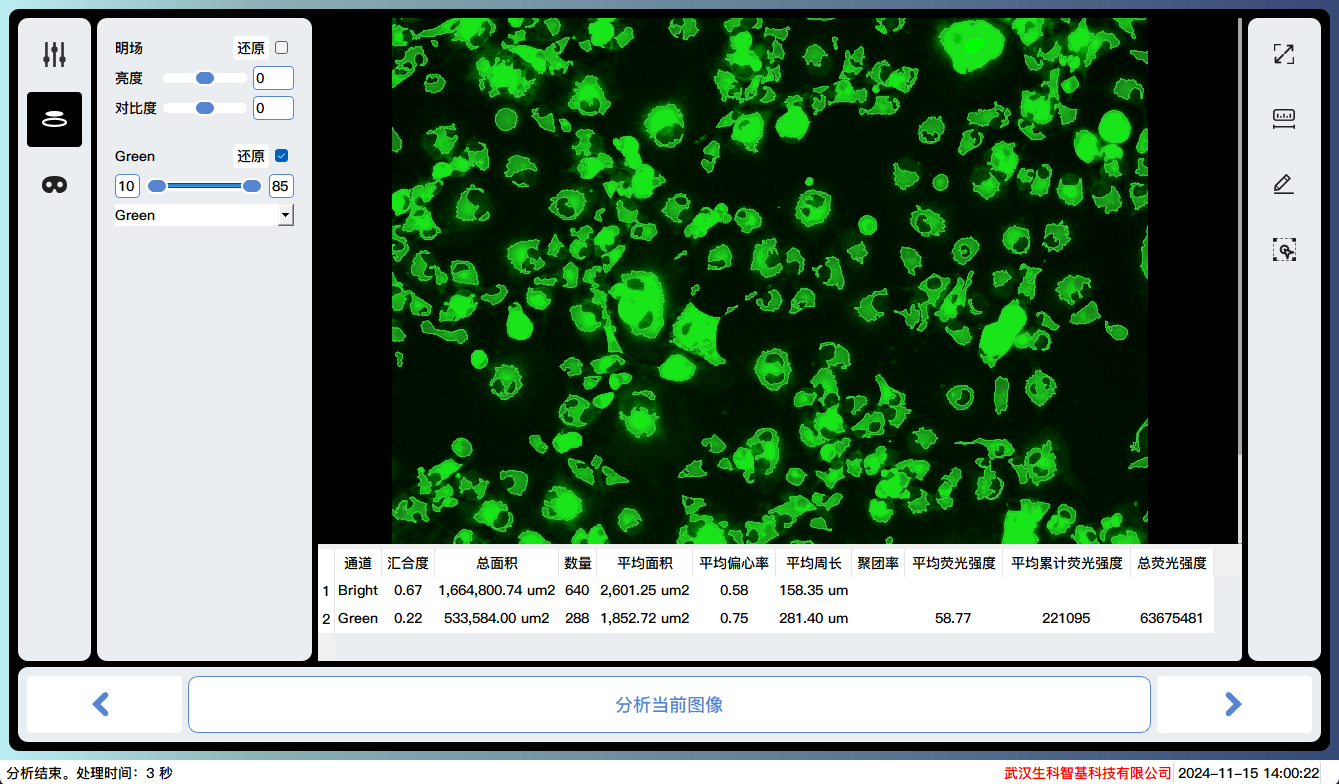
Demonstration of green fluorescence channel analysis results:
Scratch analysis
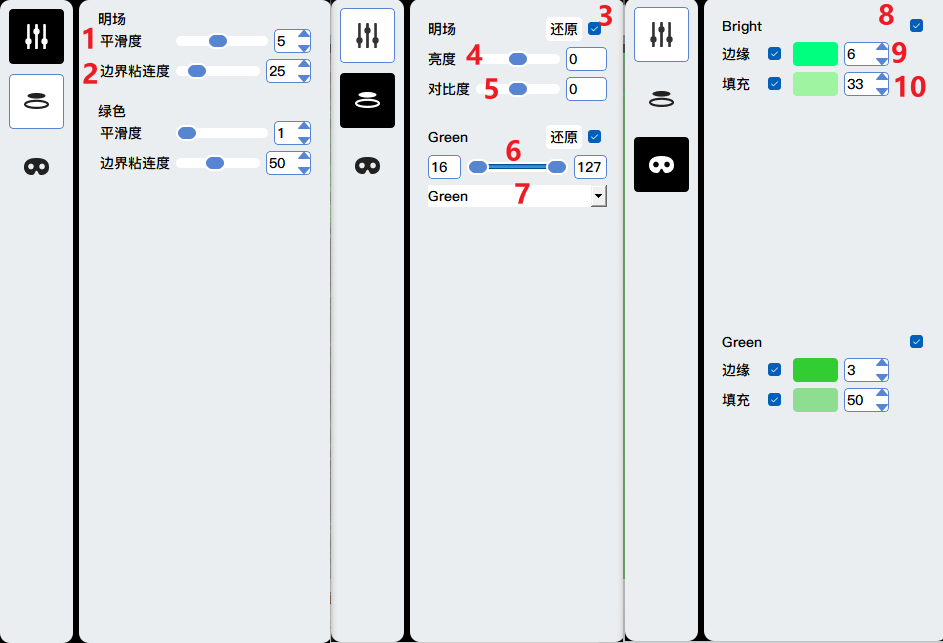
Smoothness: The smaller the size, the smaller the recognition area, and vice versa.
Boundary adhesion: The smaller the size, the larger the recognition area, and vice versa.
Display the channel image
Brightness adjustment
Contrast adjustment
Reduce background to the left and increase brightness to the right
Pseudo color selection
Display and hide the mask of a certain channel
Adjust the color and width of the edge lines of the mask
Adjust the color and opacity of the filled area
Demonstration of bright channel analysis results:
Demonstration of green fluorescence channel analysis results:
Advanced cell analysis
Similar to basic cell interfaces and operations, the advantage is higher accuracy.
Demonstration of bright channel analysis results:
Demonstration of green fluorescence channel analysis results:
Time series shooting
Start the time series shooting task according to the settings.
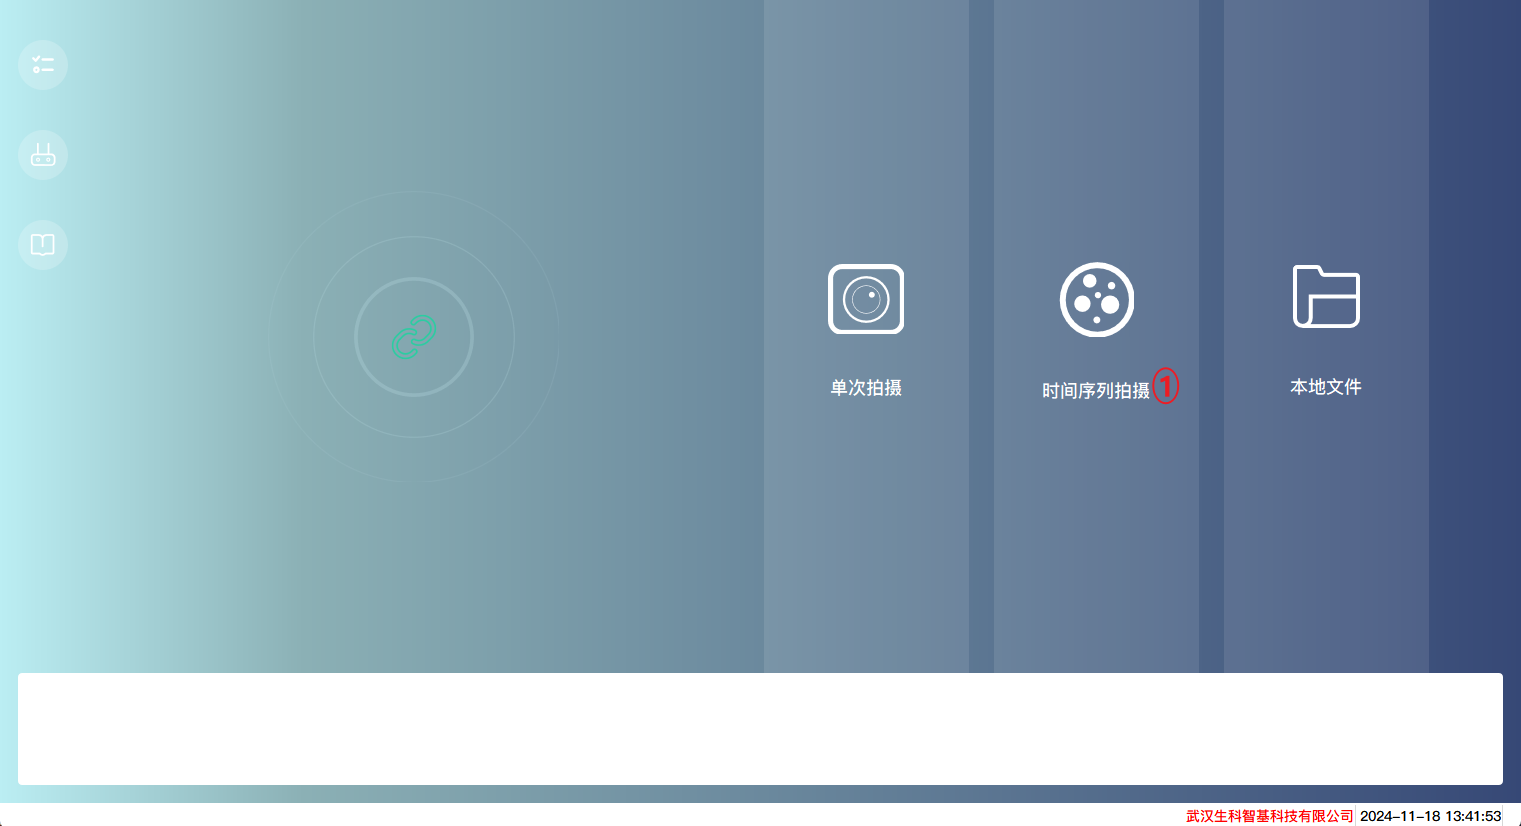
Click to enter the time series shooting task creation process
Preview
Similar to the real-time preview page in a single shooting process.
View Image
Similar to the function of viewing image pages in a single shooting process.

Experiment setup
Set the shooting method of the experimental equipment.
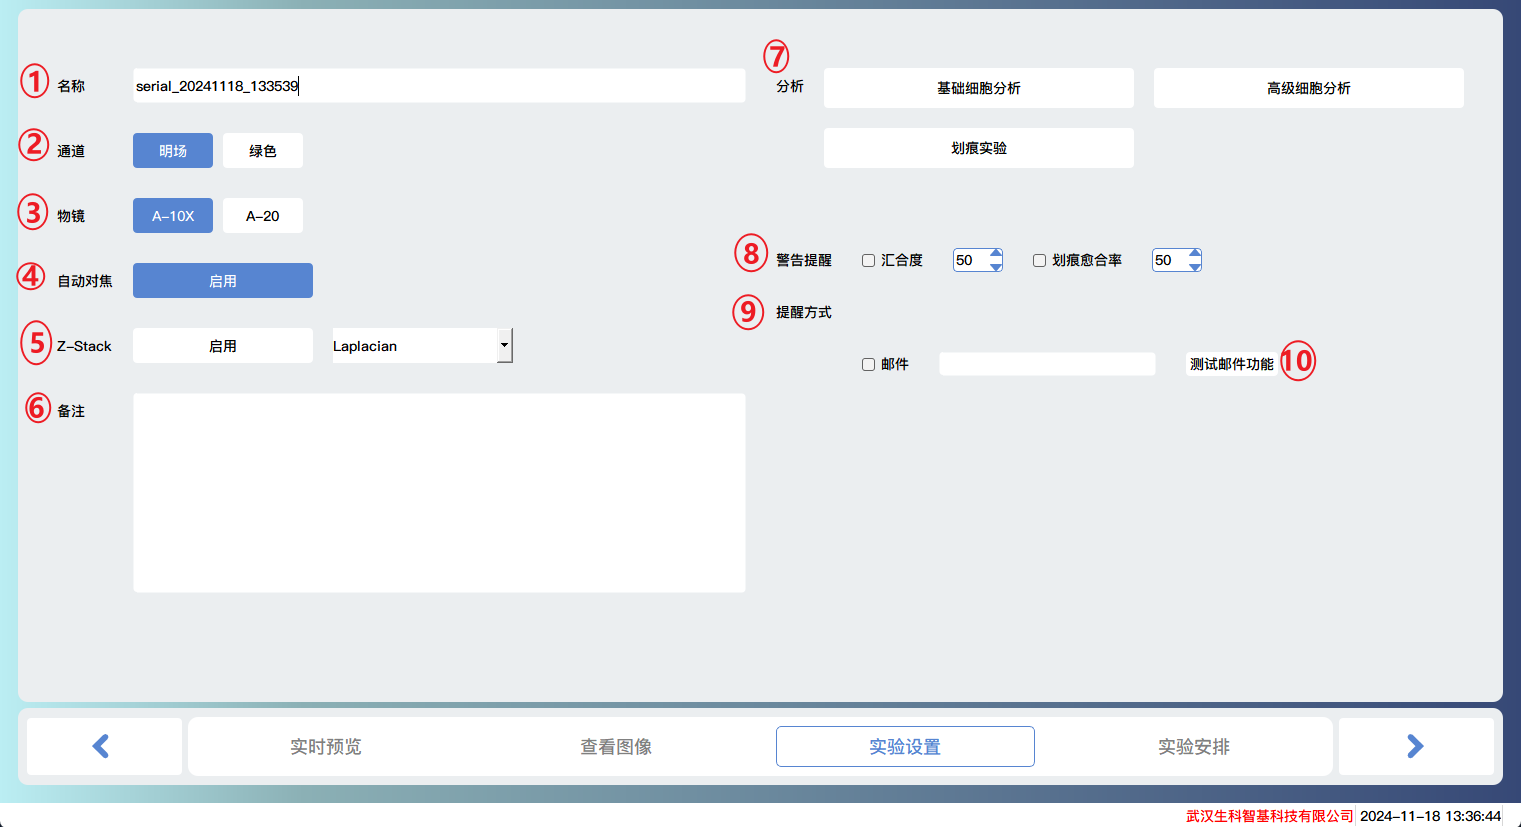
The experiment name is also the name of the experimental file
Channel selection for shooting, supports up to 4 channels for simultaneous shooting, multiple choices.
Objective lens selection, single choice.
Whether to enable autofocus
Enable ZStack and select one of the depth of field extension methods to merge multiple images into one image.
Remarks: Some information can be recorded.
Select the analysis module, single choice.
Warning reminder: Convergence degree and scratch healing rate warning can be selected. If the set value is exceeded, warning information will be displayed in the form of a dialog box.
Warning reminder method, supports sending email messages to your mailbox.
Send a test email to your email.
Experiment schedule
Set the time period for the experiment.
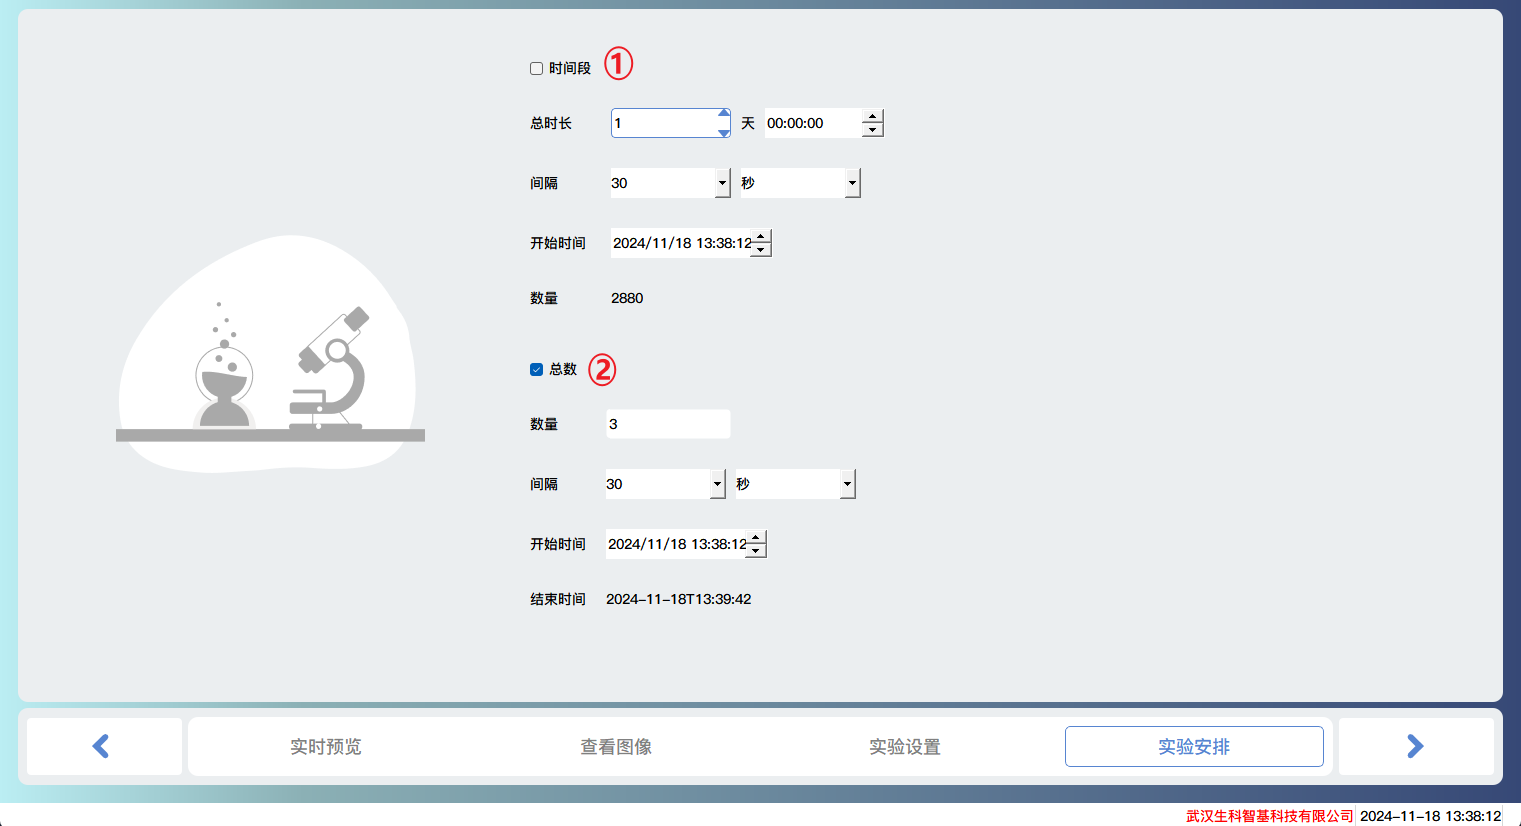
According to the total duration: Calculate the number of shots based on the set total duration and interval, and start the shooting task at the start time.
According to the time interval: Based on the number of shots and the interval, the shooting task is carried out at the starting time.
Experiment running
View the intermediate states during the experimental operation.
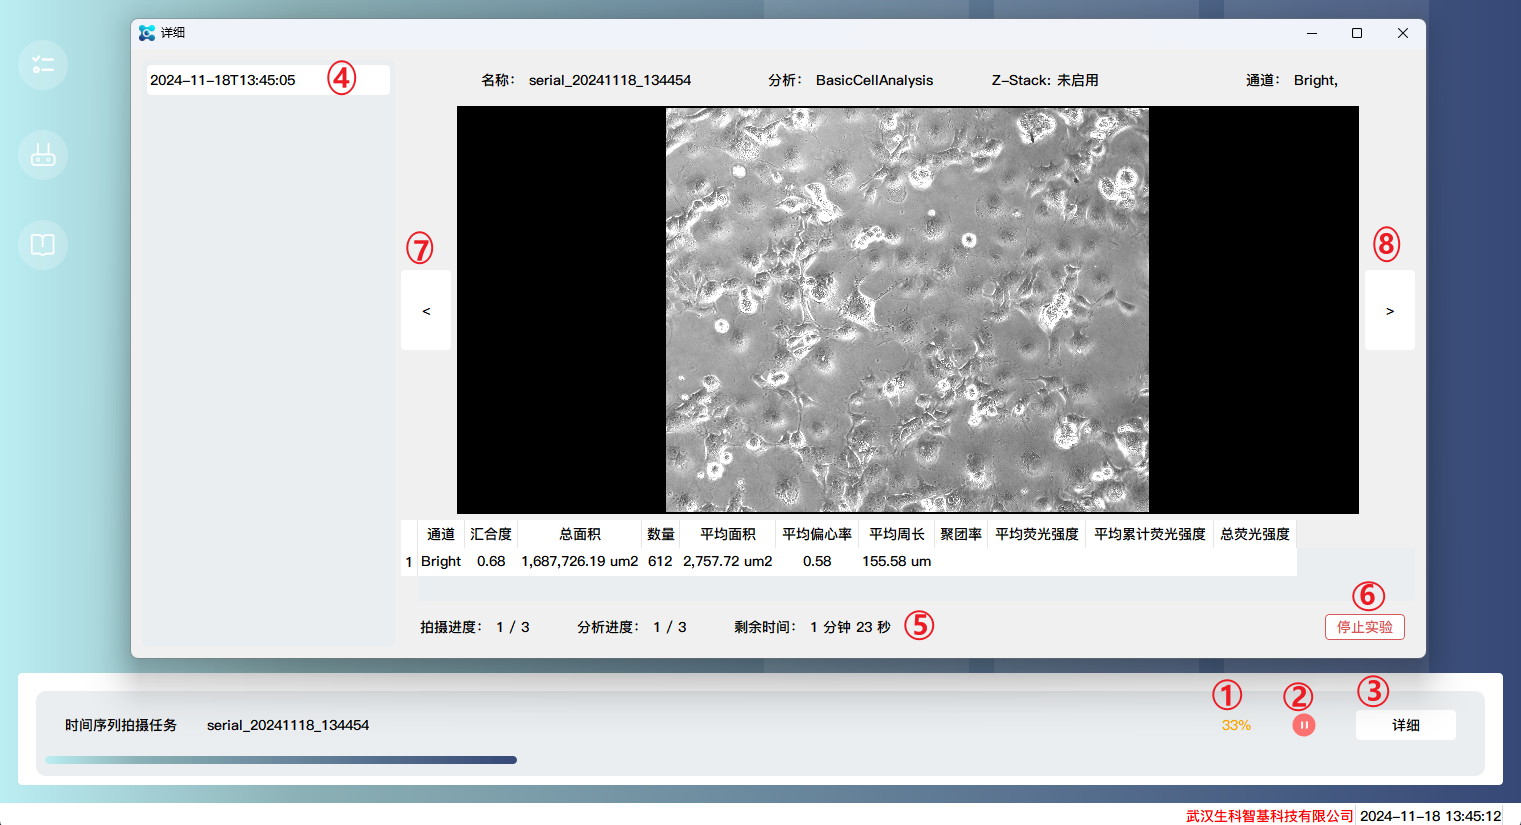
Experimental progress
Pause/Resume Experiment
Click to open the detailed information of the experiment run
The time point at which the shooting has been completed
Shooting and analyzing progress, as well as remaining time
Stop the experiment (unable to recover)
Select the previous image at the selected time point
Select the next image at the selected time point
Local files
View the relevant information of the local experimental files and have the option to perform batch analysis on the images again.
View File
View relevant information about local experimental files and import external image files.
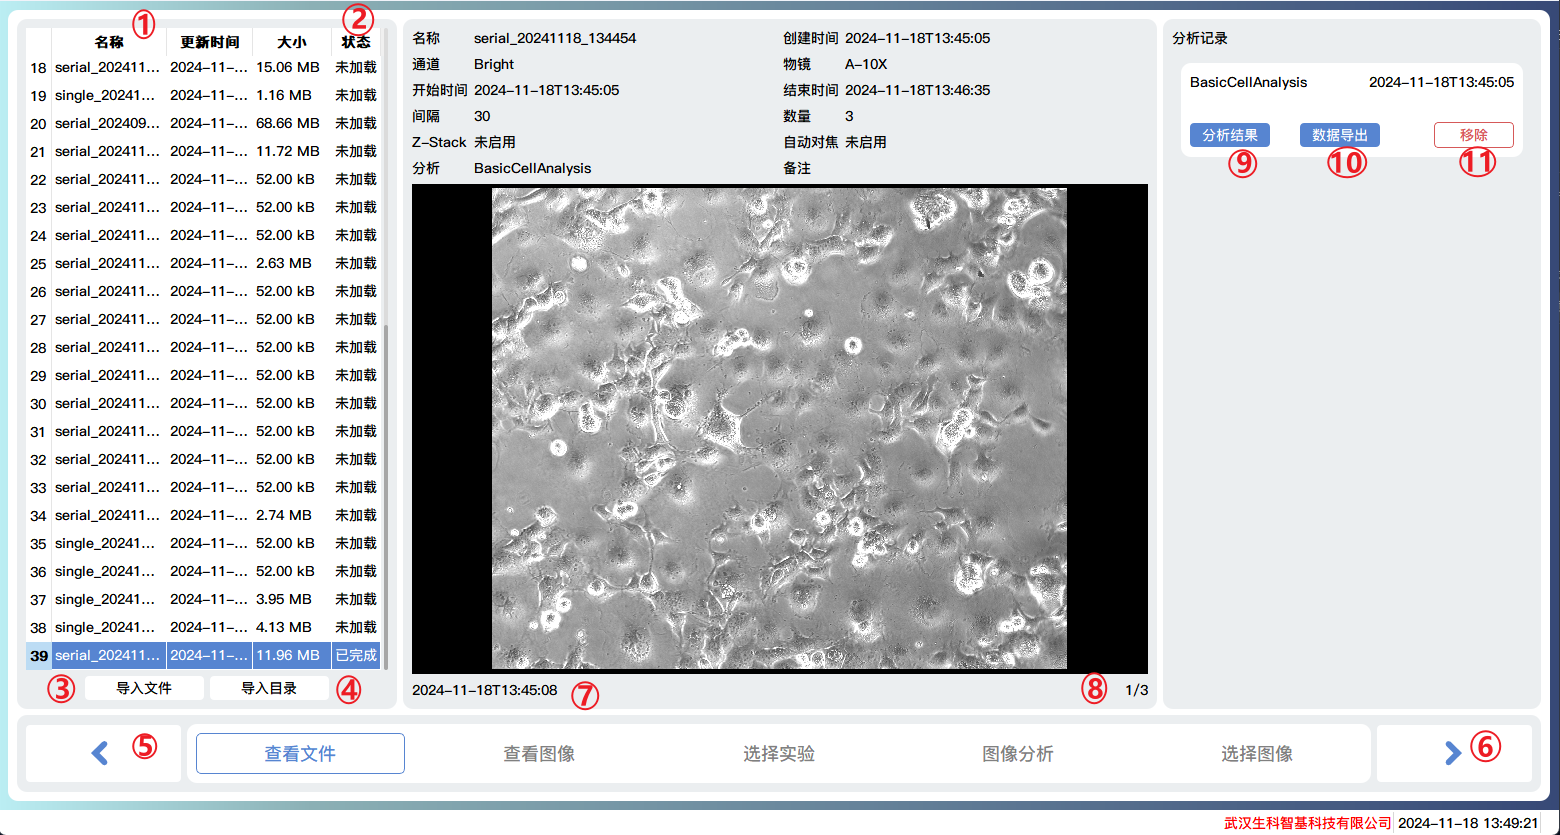
File name
File loading status, generally including unloaded, loading, and completed states.
Import a single image file
Batch import all image files in the directory
Previous step
Next step
Actual shooting time
Current image number/total number of shots taken
Analysis results
Export analysis data to a txt file
Remove analysis records (cannot be restored, permanently deleted)
View Image
Similar to the function of viewing image pages in a single shooting process.
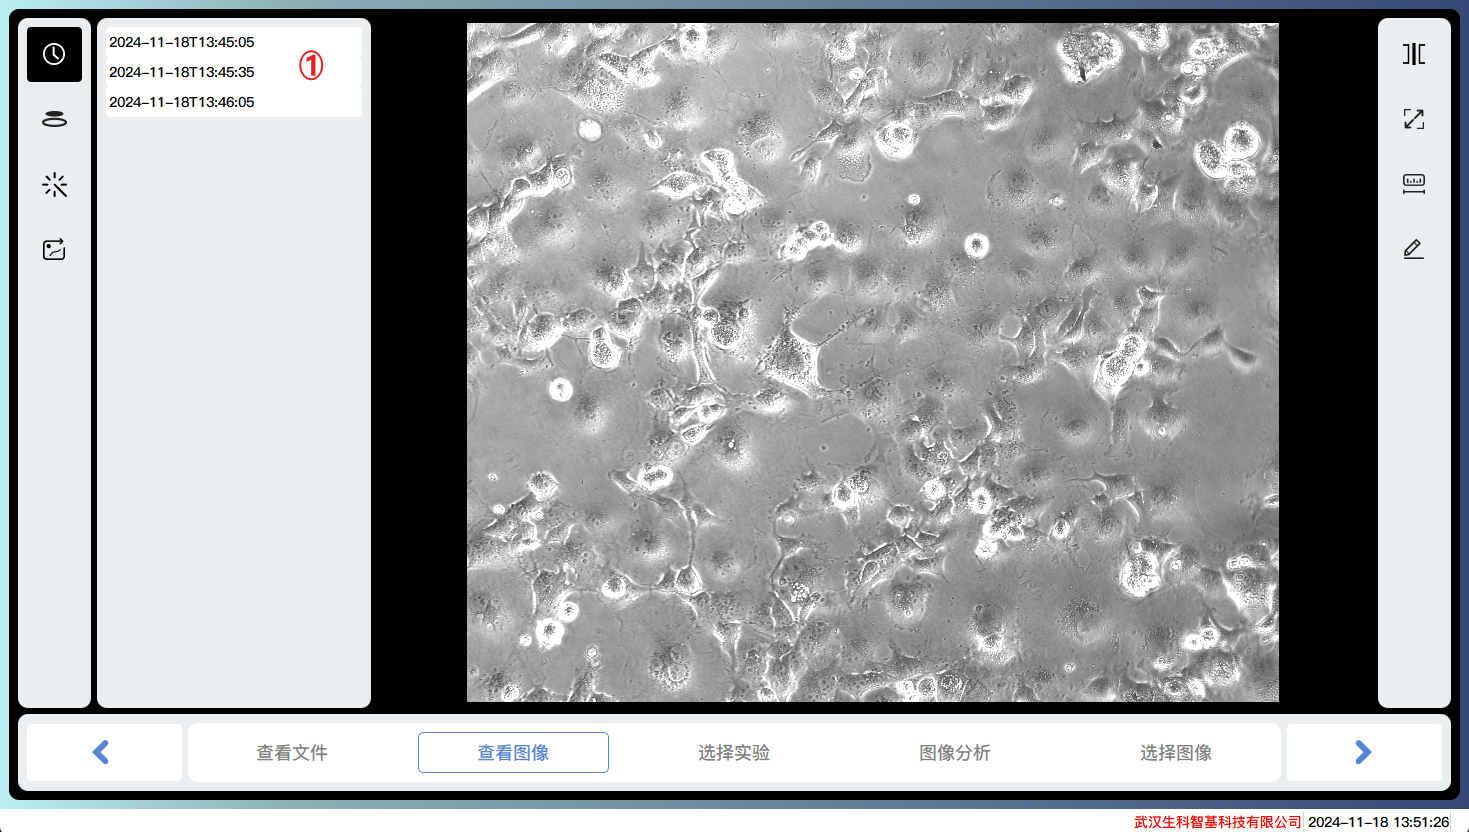
Select one of the images
Choose Experiment
Select a certain analysis module to proceed to the next step of analysis.
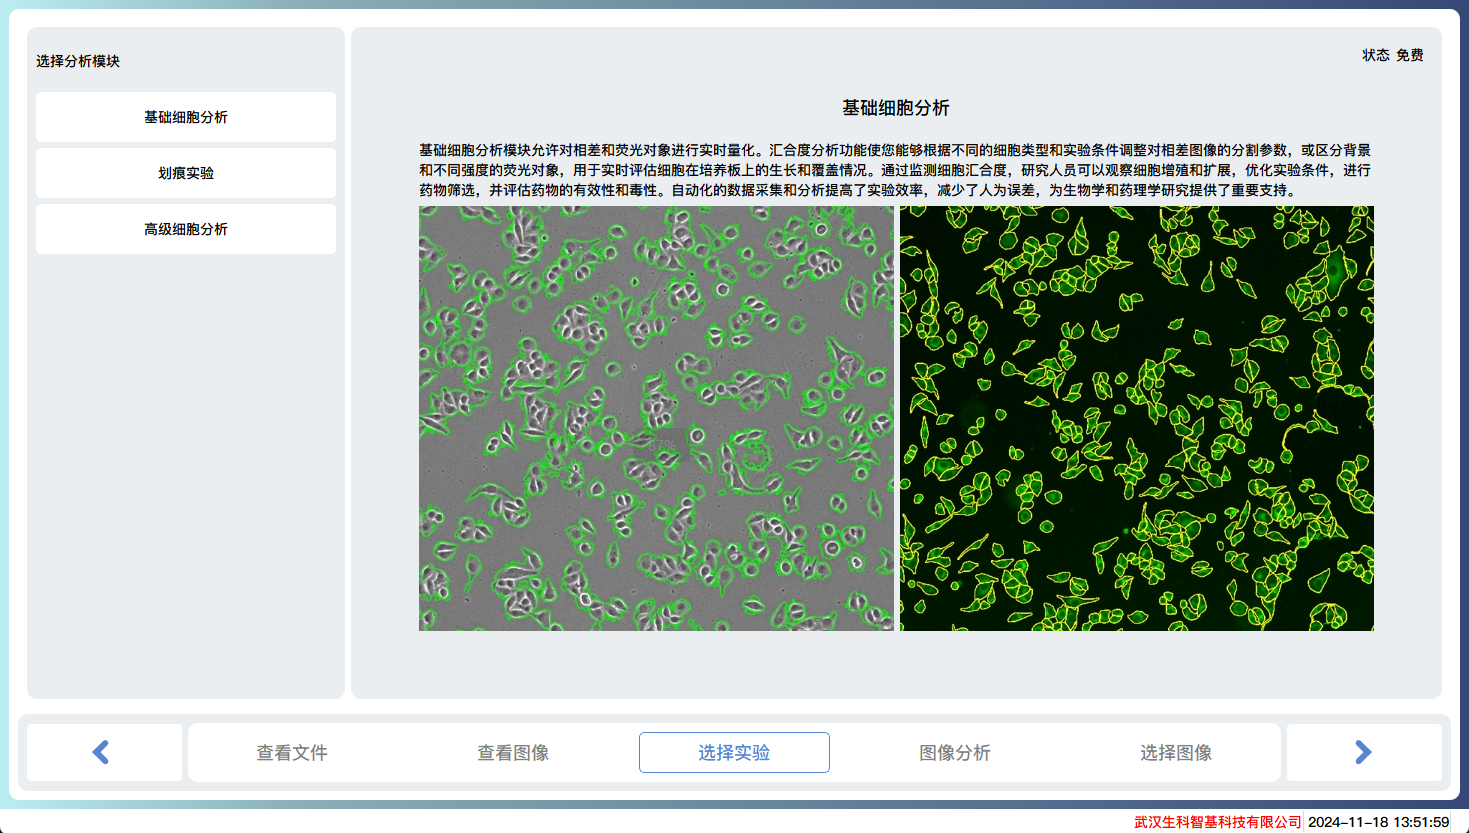
Image Analysis
Similar to the image analysis function in a single shot.
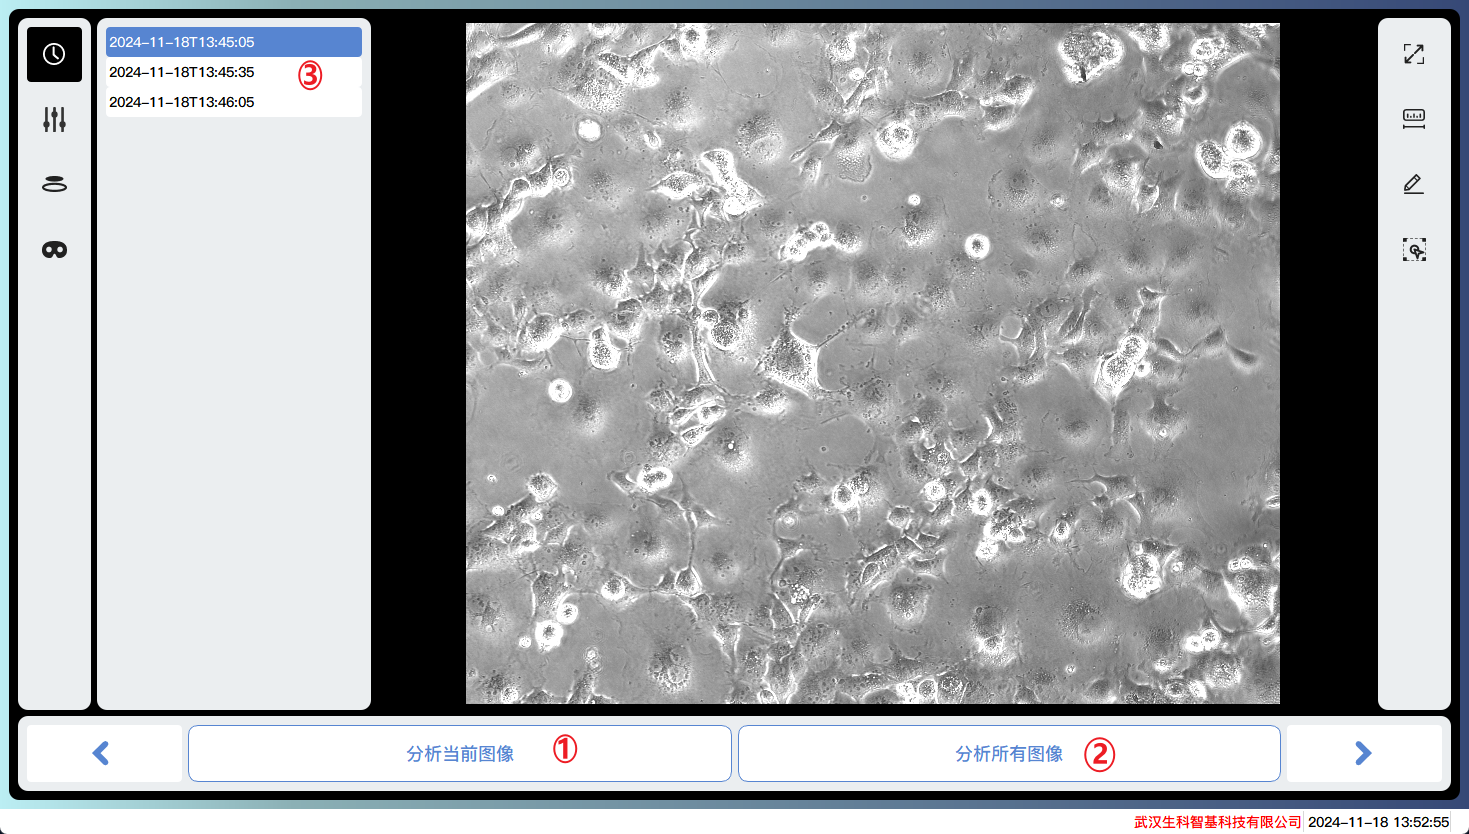
Analyze the currently selected image
Batch analyze all images
Switch current image
Select Image
Select the image to be analyzed.
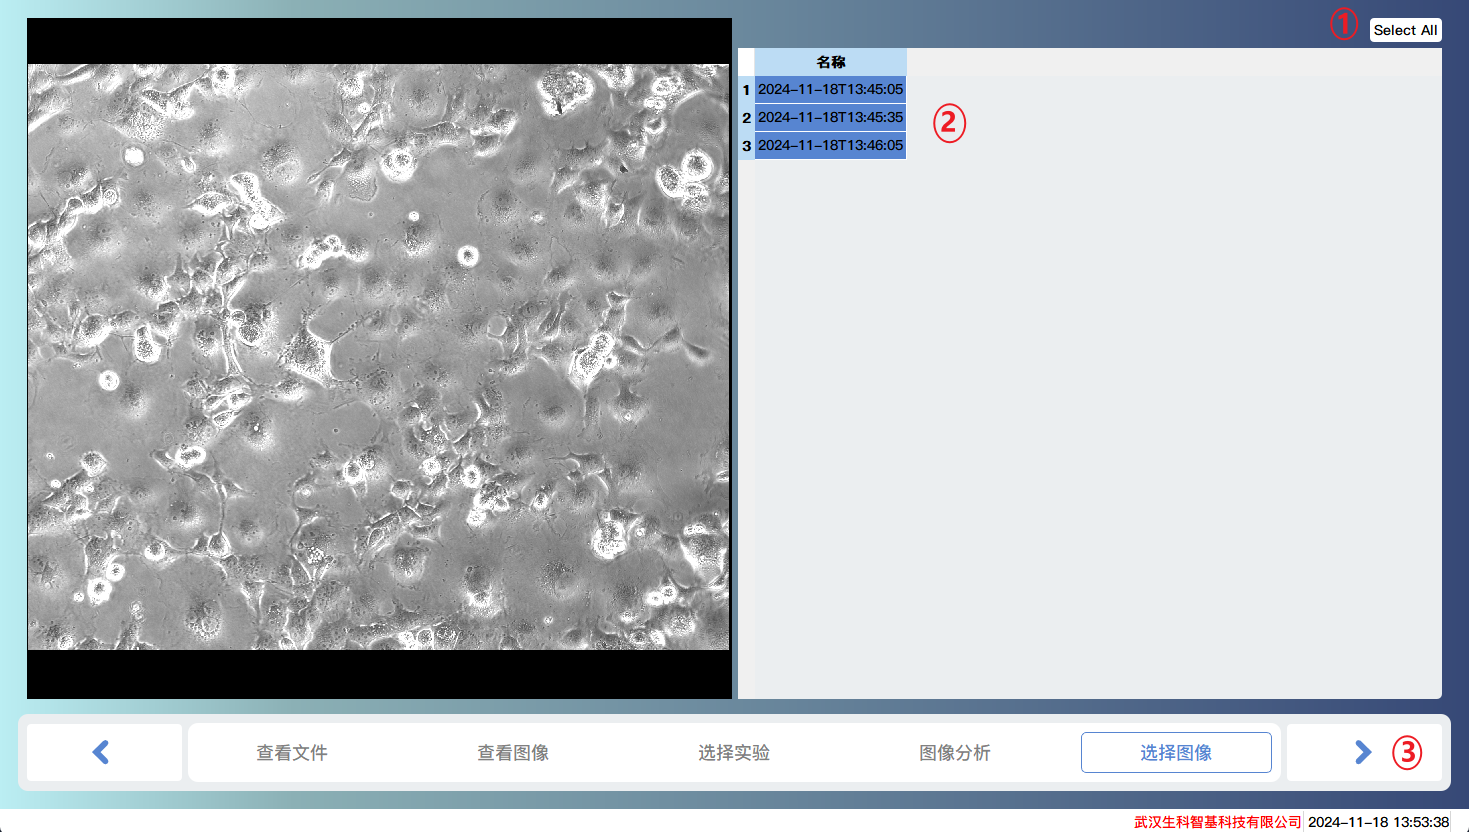
Select All
Select the image to be analyzed
The next step is to return to the main interface and start the task of batch analysis.
Analysis running
Detailed information of the analysis task
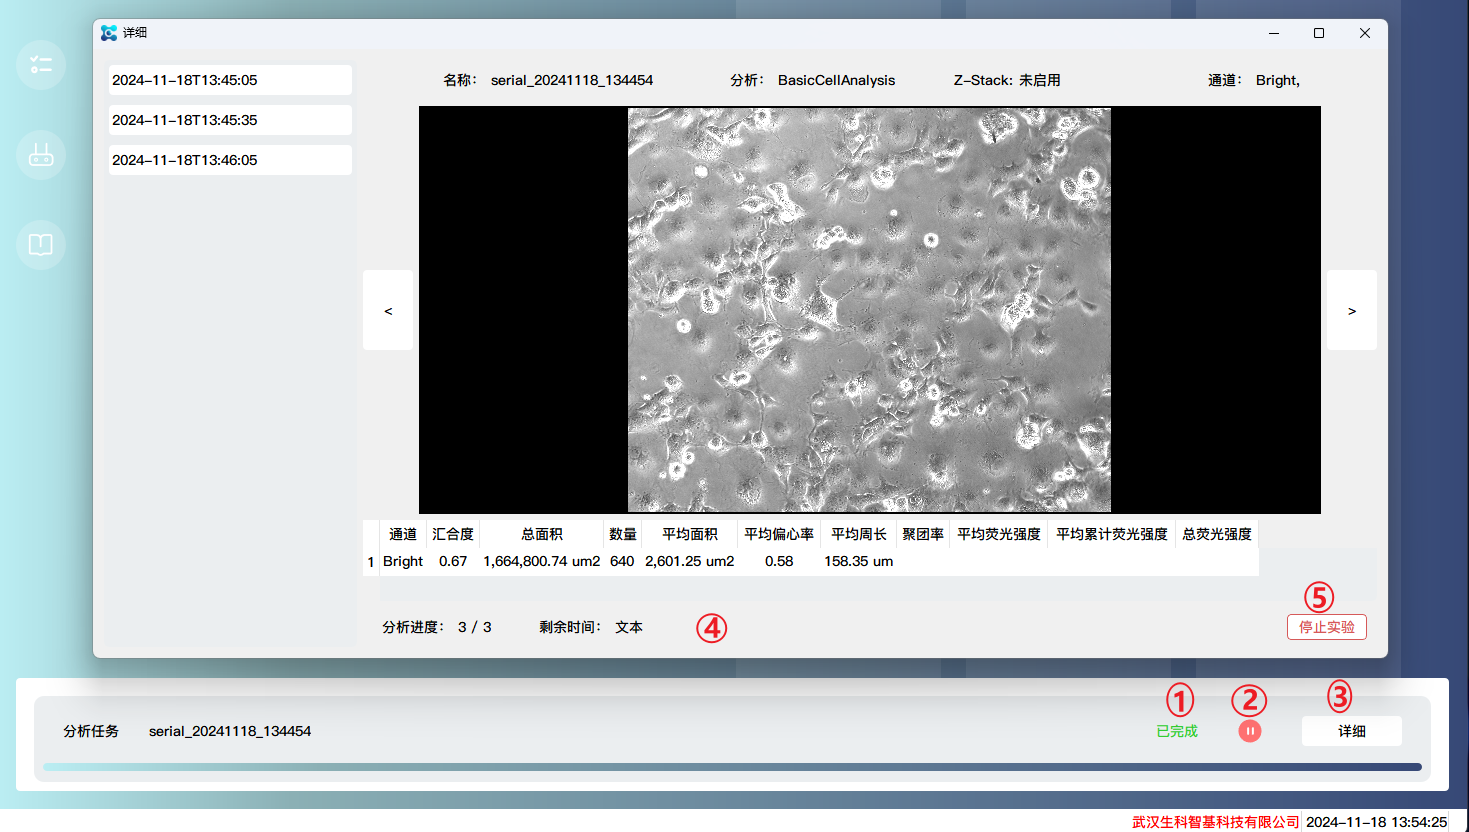
Task progress
Pause/Resume task
Click to open the detailed information of the task
Analysis progress
Stop analysis
other
user manual
By right clicking on the title bar and clicking on Help, you can open the user manual, which provides detailed instructions on how to use the software.